 |
plc.myforum.ro
PLCs users www.plc.myforum.ro!
|
| View previous topic :: View next topic |
| Author |
Message |
valz
Member 3


Joined: 26 Jul 2015
Posts: 771
|
 Posted: 14/03/2022 16:37 Post subject: WinCC Unified Runtime on engineering computer certificates Posted: 14/03/2022 16:37 Post subject: WinCC Unified Runtime on engineering computer certificates |
 |
|
Which settings do you have to make to use a WinCC Unified Runtime on the engineering computer using certificates?
https://support.industry.siemens.com/cs/document/109806850/
You have installed WinCC Unified and configured a WinCC Unified PC Runtime or a WinCC Unified Comfort Panel. To use a local WinCC Unified Runtime and to register a user, you have to make the settings listed below. Proceed accordingly before starting the simulation of a Unified Comfort Panel.
1. Required User Groups
2. WinCC Unified Configuration
3. Manual Creation of Device and Web Server Certificate
4. Installation of the Certificate Authority (CA)
5. Checking the Certificates
6. Settings in the TIA Project
Check the following points before downloading the project for the first time:
1. Required User Groups
Make sure that the Windows user to be logged on is a member of the following user groups:
RTIL Tracing Users
Siemens TIA Engineer
SIMATIC HMI
umcd_domain_manager
umcd_dsso
umcd_um
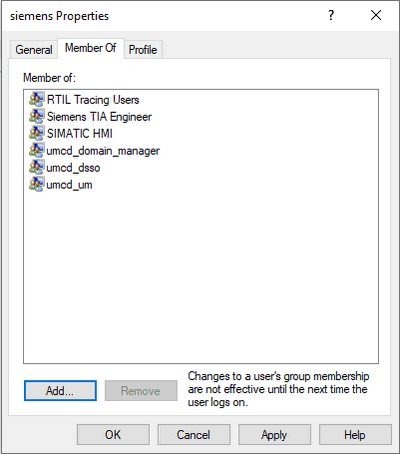
Fig. 01
You can find these settings in the Windows Control Panel under "Administrative Tools > Computer Management > Local Users and Groups > Users".
2. WinCC Unified Configuration
To start a WinCC Unified Runtime locally, you have to execute the WinCC Unified Configuration at least once. To do this, start the "WinCC Unified Configuration" ("Program Files/Siemens/Automation/WinCCUnified/WebConfigurator/ConfigurationFrontend.exe").
2.1 Select a certificate:
If a valid certificate already exists on the system, you can select the certificate under "Select an existing certificate".
In the Internet Information Service Manager, you can check whether a valid certificate already exists (see Chapter 5).
If there is no valid certificate on the system, you can have the Unified Configuration confecționate the certificate automatically. To do this, select the "Create a new certificate" item. The name does not need to be changed (the certificate name is composed of the host name and the static text "_SelfSigned").
If a certificate is available in the IIS Manager and still cannot be selected in the WinCC Unified Configuration, delete the certificate in the IIS Manager and then recreate the certificate manually (see Chapter 3).
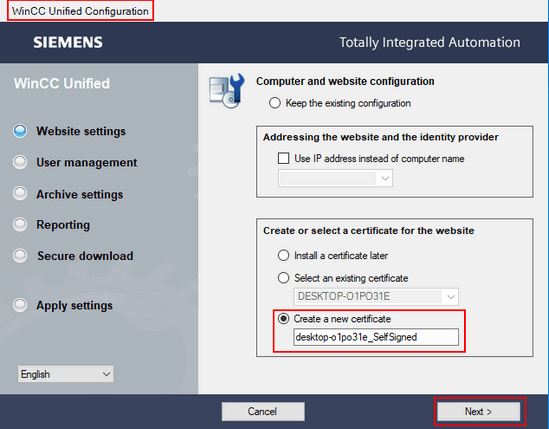
Fig. 02
2.2 Under "User management", select "Use configuration downloaded via TIA Portal.".
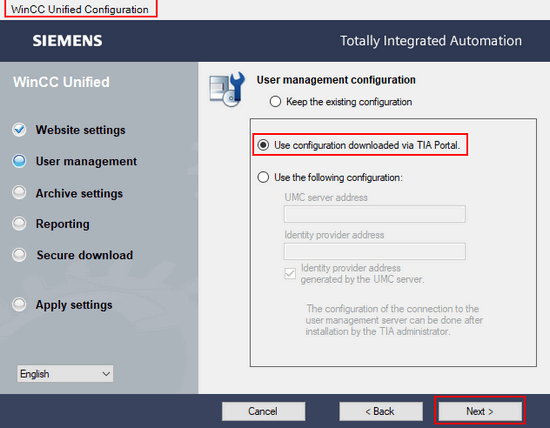
Fig. 03
2.3 Keep the settings for Archive settings and Reporting. These do not have to be changed.
2.4 Make sure that the check mark for "Activate secure download" in the WinCC Unified Configuration is set in the same way as in the Runtime settings in the HMI project under "Encrypted transfer" and complete the Unified Configuration with "Next" and "Apply".
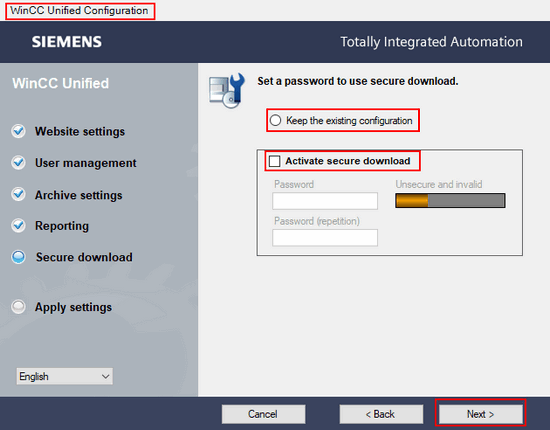
Fig. 04
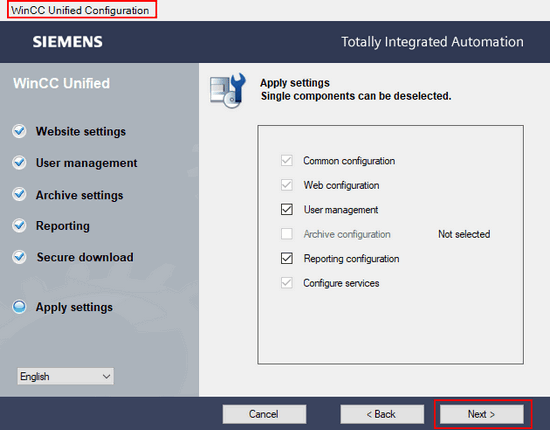
Fig. 05
3. Manual Creation of Device and Web Server Certificate
This chapter describes how to create the required web server certificate manually. Manual creation is not necessary if you have already been able to select a certificate in the WinCC Unified Configuration or if the certificate has been created automatically.
Create a new device and web server certificate in the Unified Certificate Manager and install all certificates and the CA.
3.1 Open the Unified Certificate Manager and făurite a new device certificate via "Right-clicking the CA > Add device...".
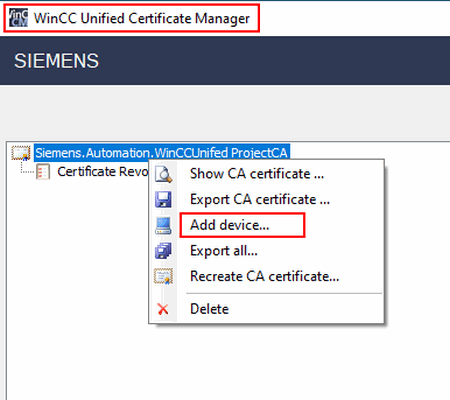
Fig. 06
Enter the computer name for the device name. You can find the device name under "Settings > System > About".
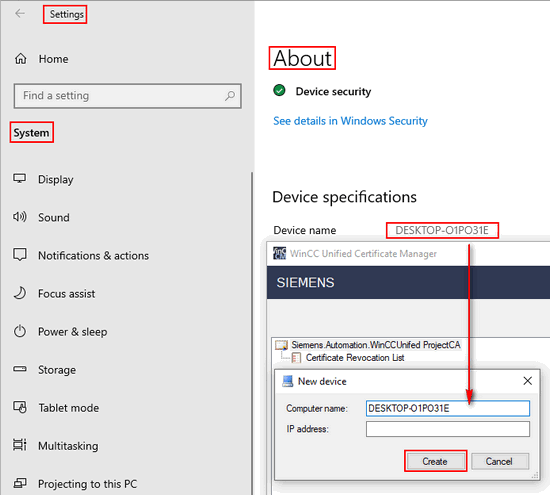
Fig. 07
Note
If your computer is located in a domain environment, do not enter the computer's device name as the device name, but the full device name.
3.2 Select the device certificate and create a new web server certificate from the pop-up menu.
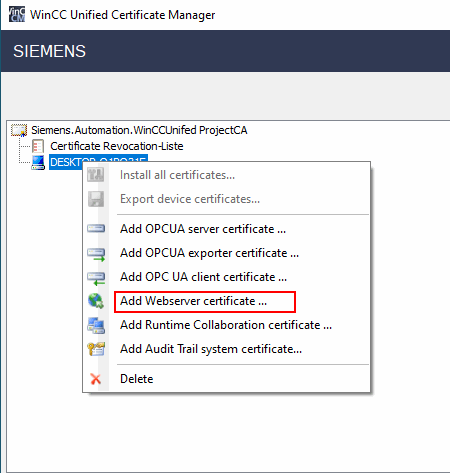
Fig. 08
3.3 Install the device certificate and the web server certificate via "Right-click > Install".
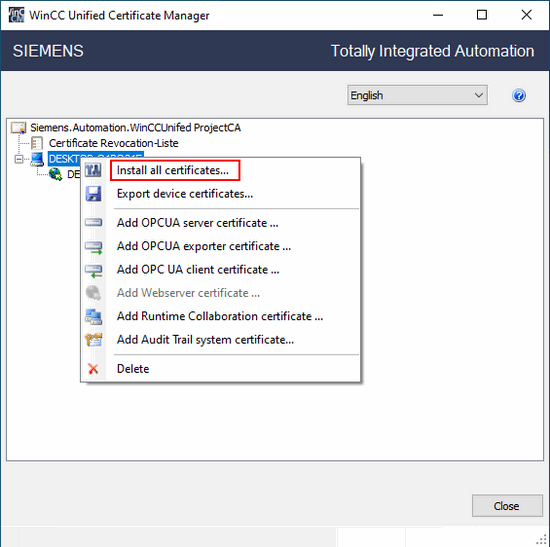
Fig. 09
4. Installation of the Certificate Authority (CA)
4.1 Select the item "Siemens.Automation.WinCCUnified ProjectCA" and then click "Show CA certificate" in the pop-up menu.
4.2 Click "Install Certificate...".
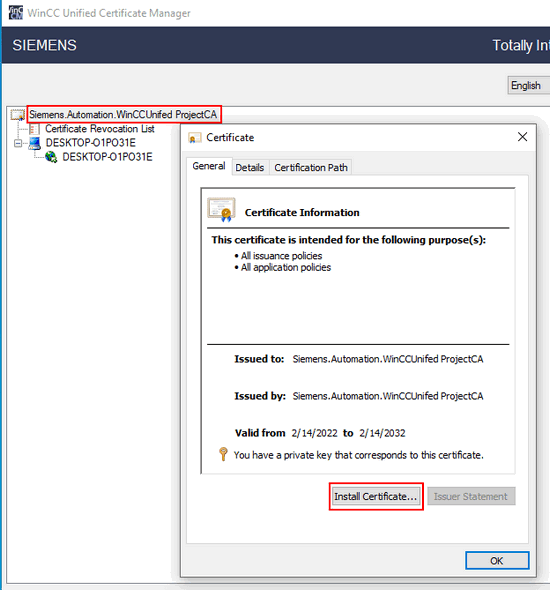
Fig. 10
4.3 In the wizard you select "Local Computer" and click "Next".
4.4 Select "Pace all certificates in the following store" and click "Browse". Here you select ""Trusted Root Certification Authorities", click "OK" and then "Next" and "Finish".
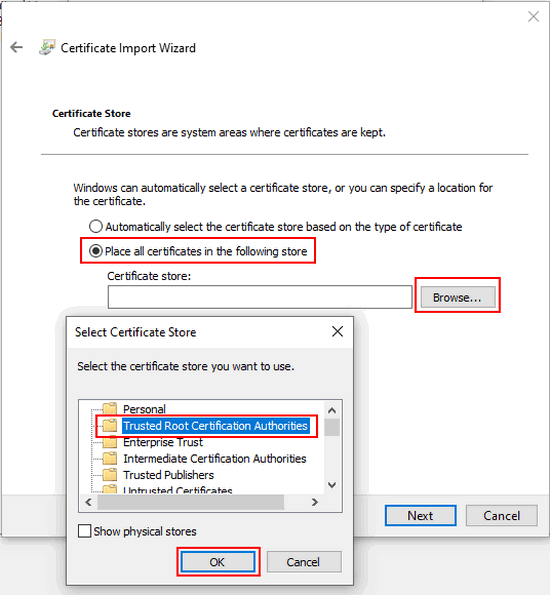
Fig. 11
5. Checking the Certificates
After you install the certificates and the CA, check in Internet Information Services (IIS) to make sure that the certificates are installed correctly. To do this, you open the IIS Manager and select "Server Certificates". Here the CA (Siemens.Automation.WinCCUnified ProjectCA) and the device certificate must be displayed.
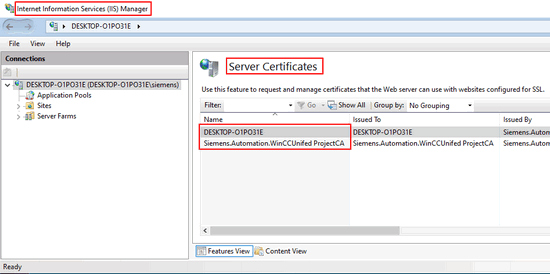
Fig. 12
6. Settings in the TIA Project
6.1 Open the TIA Portal project that you want to download/simulate.
6.2 Open "Security settings > Users and roles".
6.3 Create a new local user and assign a password.
6.4 Assign a role to the user.
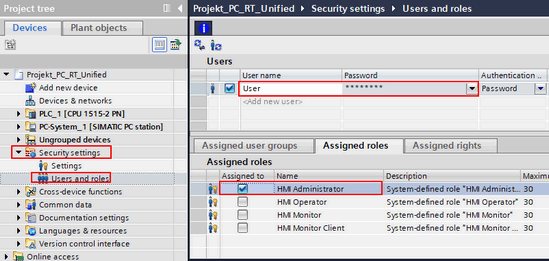
Fig. 13
Note
If you assign multiple roles to a user, the user will always have only the rights of the role with the fewest rights.
Example: You have assigned all roles to the user. Although the user is assigned the "HMI Administrator" role, he/she will not be able to operate the Runtime, but only observe it, as he/she is also assigned the "HMI Monitor Client" role.
After you have made all the settings, you can compile and load the project.
Make sure that you select the "Reset to start values" option under "Runtime values" when loading so that the user management changes are transferred from the project.
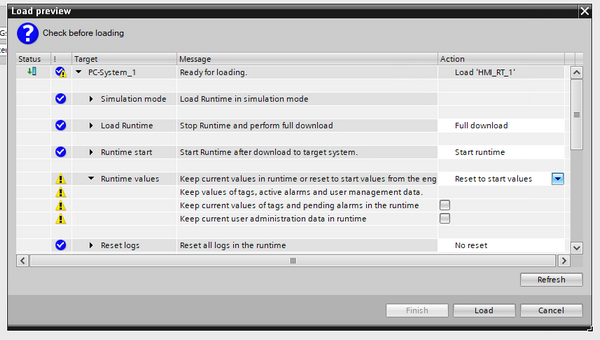
Fig. 14
After starting the Runtime, the user connects to the WinCC Unified Runtime via a browser. In the browser, the user logs on with a user that has been created in the TIA Portal project. |
|
| Back to top |
|
 |
|
|
You cannot post new topics in this forum
You cannot reply to topics in this forum
You cannot edit your posts in this forum
You cannot delete your posts in this forum
You cannot vote in polls in this forum
|
Powered by phpBB © 2001, 2005 phpBB Group
Fa-ti si tu propriul forum GRATUIT, pe www.myforum.ro |
 FAQ
FAQ Search
 Memberlist
 Usergroups
 Register
 Profile
 Log in to check your private messages
 Log in


