| View previous topic :: View next topic |
| Author |
Message |
maersk
Member 3


Joined: 17 Aug 2014
Posts: 891
|
 Posted: 01/04/2016 18:16 Post subject: TIA Translation Tool Posted: 01/04/2016 18:16 Post subject: TIA Translation Tool |
 |
|
TIA Translation Tool
The reference texts are exported from the TIA Portal project and imported to the TIA Translation Tool. The TIA Translation Tool now enables the translation of the texts from the reference language into the selected or previuosly imported target languages. The translation is done either by direct entry with the aid of proposals, or automatically from one or more dictionaries.
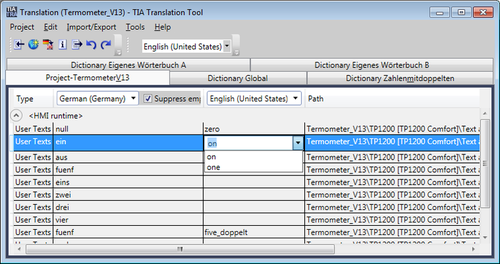
Basic procedure:
Export of the project texts from the project in the Totally Integrated Automation Portal
Import of the project texts of all exported languages into the TIA Translation Tool
Manual or automatic translation into the desired target languages
Export of the translated texts from the TIA Translation Tool
Import of the translated texts to the project in the Totally Integrated Automation Portal
https://support.industry.siemens.com/cs/attachments/109475709/109475709_TIA_Translation_Tool_DOC_en.pdf
https://support.industry.siemens.com/cs/attachments/109475387/TIATranslationTool_V1.1.5.zip |
|
| Back to top |
|
 |
AnteSavilt
Member 2


Joined: 13 Feb 2018
Posts: 264
Location: Croatia
|
| Posted: 11/03/2021 13:04 Post subject: TIA Translation Tool V2 |
|
|
TIA Translation Tool V2
https://support.industry.siemens.com/cs/document/109475387/
The reference texts are exported from the TIA Portal project and imported to the TIA Translation Tool. The TIA Translation Tool now enables the translation of the texts from the reference language into the selected or previuosly imported target languages. The translation is done either by direct entry with the aid of proposals, or automatically from one or more dictionaries.
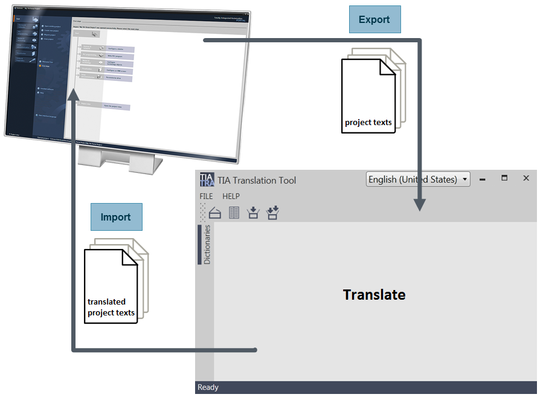
Basic procedure:
Export of the project texts from the project in the Totally Integrated Automation Portal
Import of the project texts of all exported languages into the TIA Translation Tool
Manual or automatic translation into the desired target languages
Export of the translated texts from the TIA Translation Tool
Import of the translated texts to the project in the Totally Integrated Automation Portal
Important note for the use of Translation Tool with TIA Portal V15.1:
With V15.1 the language export of the TIA portal was enlarged, so that several target languages can be exported into a single XLSX file. These export files cannot be used with the Translation Tool. To still work with Translation Tool and TIA Portal V15.1, only one target language must be exported from the TIA Portal.
Download:
https://support.industry.siemens.com/cs/attachments/109475387/TIATranslationTool_V2.3.1.zip
m
https://ulozto.net/file/rJU8klcAdRZe/tiatranslationtool-v2-3-1-zip
m
[url=http://www.girlshare.ro/3770021827]TIATranslationTool_V2.3.1.zip[/url]
Last edited by AnteSavilt on 11/03/2021 13:10; edited 1 time in total |
|
| Back to top |
|
|
AnteSavilt
Member 2
Joined: 13 Feb 2018
Posts: 264
Location: Croatia
|
| Posted: 11/03/2021 13:09 Post subject: TIA Translation Tool Configuration Instructions |
|
|
TIA Translation Tool Configuration Instructions
https://support.industry.siemens.com/cs/document/109475709/
With the TIA Translation Tool, you can translate your project texts automatically with the help of dictionaries. Due to growing dictionaries, you will by and by achieve a high level of translation.
The TIA Translation Tool simplifies the translation of project texts.
In this application example, you find out how to create new projects,
export project texts from the TIA Portal into the TIA Translation Tool,
add new languages, translate project texts automatically or manually,
integrate, use, create and maintain dictionaries, evaluate the translation analytically, and how to import project texts from the TIA Translation Tool into the TIA Portal.
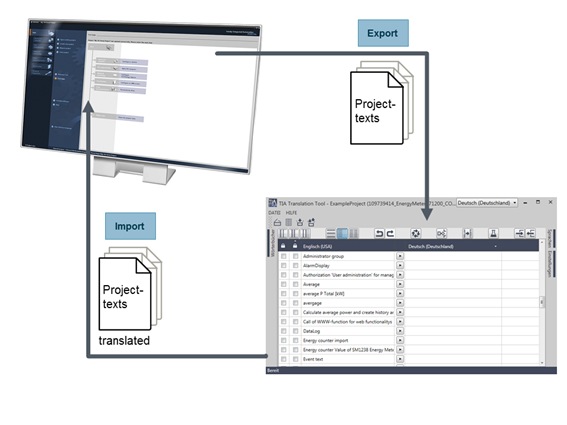
TIA Translation Tool V2 offers you the following advantages:
A simplified user interface compared to TIA Translation Tool V1
An effective translation through comprehensive dictionaries
Time and cost savings through automatic translation
Download
https://support.industry.siemens.com/cs/attachments/109475709/109475709_TIA_Translation_Tool_V2_DOC_en.pdf
https://support.industry.siemens.com/cs/attachments/109475709/109475709_TIA_Translation_Tool_DOC_en.pdf
m
https://ulozto.net/tamhle/QXi5vXVoaVNM/
m
[url=http://www.girlshare.ro/3770021828.1]109475709_TIA_Translation_Tool_V2_DOC_en.pdf[/url]
[url=http://www.girlshare.ro/3770021829.2]109475709_TIA_Translation_Tool_DOC_en.pdf[/url] |
|
| Back to top |
|
|
nettto
Junior 2

Joined: 04 Jan 2018
Posts: 29
|
| Posted: 12/03/2021 14:39 Post subject: MS Excel into a PLC data type |
|
|
How do you import variables from MS Excel into a PLC data type in STEP 7 (TIA Portal)?
https://support.industry.siemens.com/cs/document/78786898/
STEP 7 (TIA Portal) gives you the option of importing variables from Microsoft Excel into your PLC data type.
Description
Prepare your data in Microsoft Excel as shown in Fig. 1. Then proceed as follows to import your variables to STEP 7 (TIA Portal).
In Excel you mark all the cells that include your variables and save the data in the buffer memory using the key combination "CTRL+C".
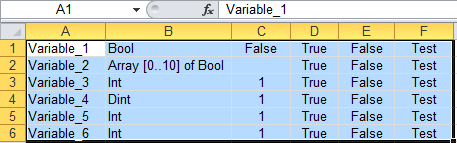
Fig. 1
In STEP 7 (TIA Portal) you open the project navigation and add a new PLC data type.
In the "PLC data type" dialog you mark the first upper cell on the left (<Add>) and press the key combination "CTRL+V".
Note
Make sure that you only mark the cell and do not activate it (cursor must not be visible in the cell)!
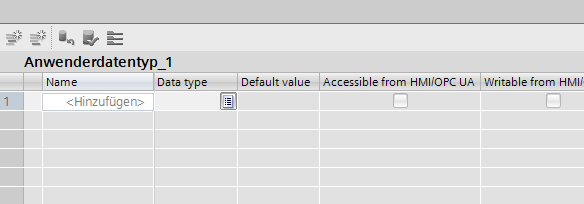
Fig. 2
This procedure ensures that all the variables are displayed correctly as in Fig. 3. Save and compile your project.
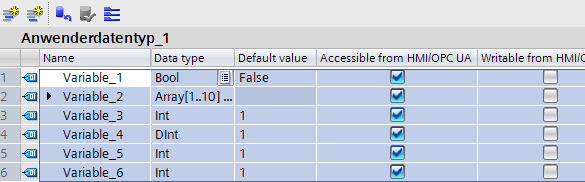
Fig. 3
Notes
The procedure described works in the same way as for copying in variable tables, data blocks etc.
The reverse procedure, copying from the TIA Portal and pasting in Excel also works without a problem. |
|
| Back to top |
|
|
nettto
Junior 2
Joined: 04 Jan 2018
Posts: 29
|
| Posted: 12/03/2021 14:41 Post subject: Excel list with STEP 7 variables |
|
|
How do you import an Excel list with STEP 7 variables into a data block?
https://support.industry.siemens.com/cs/document/24352635/
If you wish to import variables from an Excel list into your STEP 7 project, the Excel list has to be saved before hand in the compus 'Formatted Text (Space delimited)(*.prn)'.
Instructions
The procedure for this is described below:
Open MS Office Excel and enter the tags for the data block, as shown in Fig. 1. Use one column for the names of the tags and another for the data types:
Note
Regarding to later compiling of source data block we recommend to enter the values (example Real initial values) with point format, example 123.45
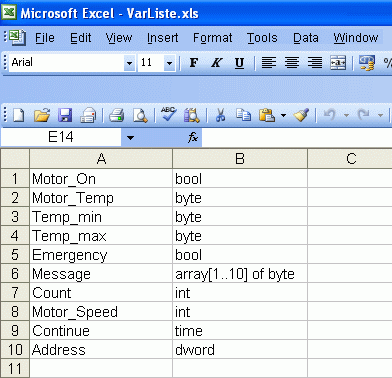
Fig. 1
Initial values
If you don't require initial values for your data block, skip this step and proceed to No. 3. Otherwise, enter the initial values for your tags, as shown in Fig. 2 (column E).
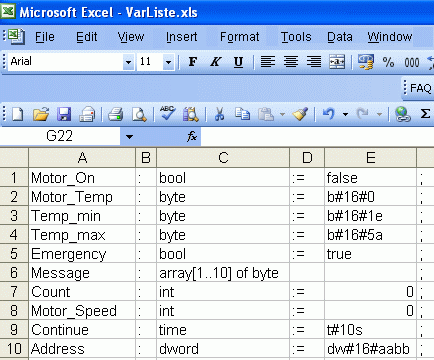
Fig. 2
We would advise you to enter the following columns for your tags in the Excel list;
a column with colons (":") next to the column with the tag names,
a column with the assignments (":=") for the tags with the initial values beside the column for the data types
and a column with the semicolon (";"), as shown in Fig. 2.
These syntax characters can also be added later in the source for the data block. The assignment for each tag with a data type entails a colon, and the assignment with an initial value entails the string ":=". Each instruction must be closed with a semicolon, such as the assignment of the tag "Motor_On: bool:= false;".
Using "File > Save as...", save your Excel list in a folder on your hard disk as a "Formatted Text (Space delimited)(*.prn)" file type. Therefore, the filename should be a ".prn" type.
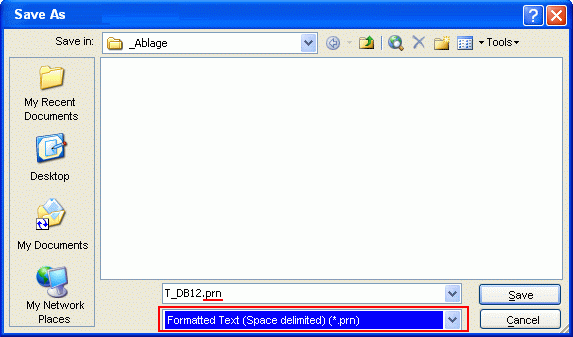
Fig. 3
Click OK to acknowledge the message "The selected file type does not support workbooks with multiple sheets."
Click Yes to acknowledge the message "<Filename>.prn may contain features which are no compatible with Formatted Text (Space delimited). Would you like to save the workbook in this format".
Then go to your folder and select the file which you have saved there. Right-click it. This opens the pop-up menu. Click "Rename" and change the file type from <Filename>.prn to <Filename>.awl. Click Yes to confirm the message which then appears.
Import the AWL file which has been created into your STEP 7 project. To do this, select the source folder for your STEP 7 project and open the "Insert External Source" dialog in the SIMATIC Manager via "Insert > External source...". As shown in Fig. 04, select the created AWL file from your storage path and click "Open".
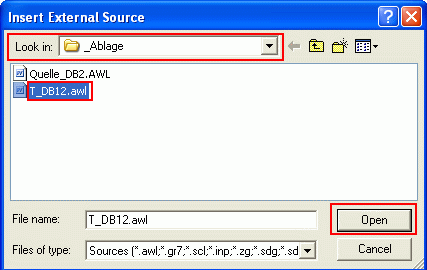
Fig. 4
The AWL file is now imported as an external source.
Open the imported AWL source in the source folder and insert your data block template for your tags via the commend "Insert > Block Template > DB" in the menu.
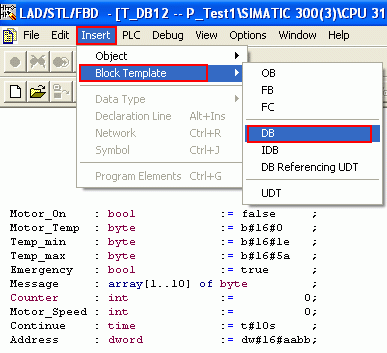
Fig. 5
Delete the comments (green text) which are surplus to requirements and drag & drop your tags between "STRUCT" and "END_STRUCT". Adapt the number of the data block and also delete the tag "b0" from the declaration and the instruction "b0:= b#16#01" between "BEGIN" and "END_DATA_BLOCK".
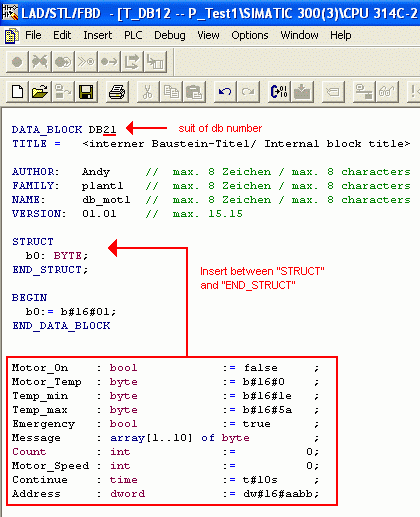
Fig. 6
Save and compile the source data block via the disk and compiler icons or via "File > Save" and "File > Compile".
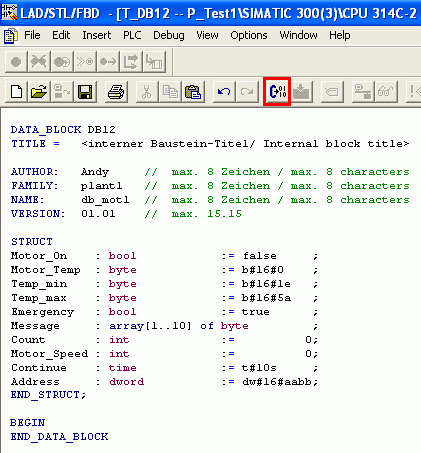
Fig. 7
The data block is now available for further processing within your STEP 7 project.
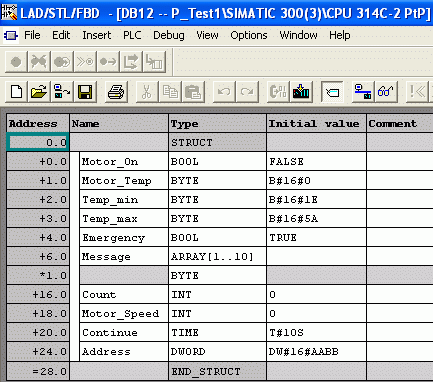
Fig. 8 |
|
| Back to top |
|
|
nettto
Junior 2
Joined: 04 Jan 2018
Posts: 29
|
| Posted: 12/03/2021 14:49 Post subject: TIA Translation Tool and Google Translate |
|
|
Translate with TIA Translation Tool and Google Translate
1. Generate the Excel file from your Project with TIA Translation Tool
2 Open the Excel File
3. Use the method from
Translation Function… Excel In A Capsule (Episode 13)
https://www.youtube.com/watch?v=5rTXiOHRomU&ab_channel=Officeinstructor
and translate in the Language you need
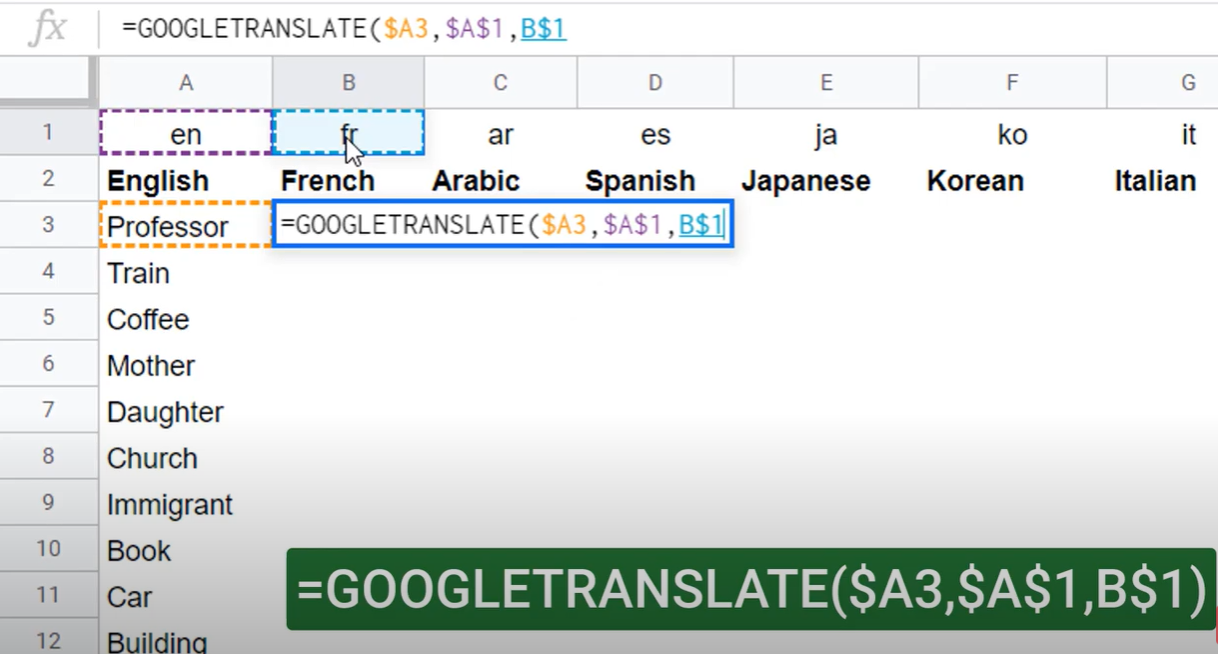
4. Import Excel in TIA Poetal as in Translate Tool
Good luck!!! |
|
| Back to top |
|
|
32xwu
Junior

Joined: 22 Jul 2021
Posts: 1
|
| Posted: 22/07/2021 16:21 Post subject: |
|
|
 |
|
| Back to top |
|
|
|

 FAQ
FAQ Search
 Memberlist
 Usergroups
 Register
 Profile
 Log in to check your private messages
 Log in


