 |
plc.myforum.ro
PLCs users www.plc.myforum.ro!
|
| View previous topic :: View next topic |
| Author |
Message |
valz
Member 3


Joined: 26 Jul 2015
Posts: 771
|
 Posted: 17/02/2022 19:39 Post subject: Replace a defective HDD in the vSAN SIVaaS Posted: 17/02/2022 19:39 Post subject: Replace a defective HDD in the vSAN SIVaaS |
 |
|
How do you correctly replace a defective HDD in the vSAN context with SIMATIC Virtualization as a Service (SIVaaS)?
https://support.industry.siemens.com/cs/document/109804677/
Unlike a standalone host, if a disk fails in a vSAN host, it is not allowed to simply pull the defective disk and replace it with a new one. After such a procedure, the defective disk could no longer be removed from the disk management and would therefore be permanently displayed as a "defective disk".
Warning
This description is only valid for Hybrid Disk Groups, i.e. for groups that have both an SSD cache disk and conventional HDDs for the storage area.
Error description
If a defective disk in a vSAN host is removed from the host without further action and replaced with a new one, the removed (defective) disk will continue to be displayed as "Absent Disk" in vCenter Skyline Health or also in vCenter Disk Management.

Fig. 1
This disk can then no longer be removed via the "Configure > Disk Management > Disk Group > Remove Disk" dialog, because the "REMOVE" button is disabled.
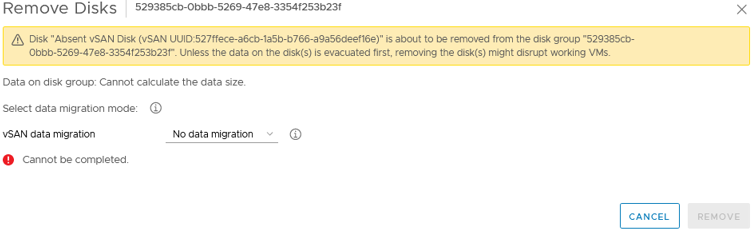
Fig. 2
To correctly replace your defective disk, first leave it in your host and then perform the following steps in the given order.
1. Identify the defective disk on the host
You can recognize the defective disk on your host among other things by:
Yellow flashing LED status indicator
Error message in iLO interface: "Physical Drive in Port XX Box Y Bay ZZZ - Status: Degraded (predictive failure)"
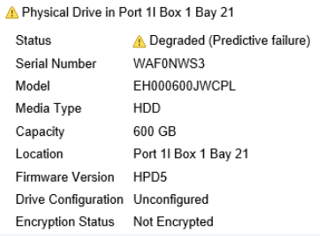
Fig. 3
An alarm is triggered in parallel in Skyline Health (vSAN Cluster > Monitor > vSAN > Skyline Health):
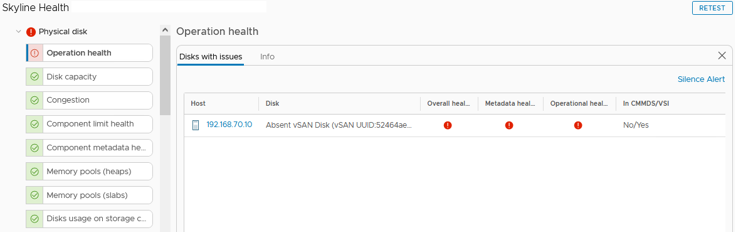
Fig. 4
2. Identification of the defective disk in vCenter vSAN-Disk Management
In Disk Management, identify the disk group that is marked as defective. It includes the defective disk. You can recognize these in turn by the "Dead or Error" status.
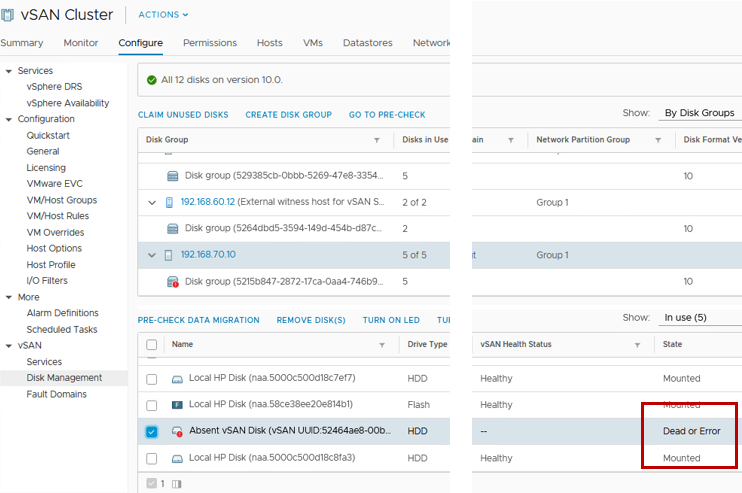
Fig. 5
Determine the defective disk via the "TURN ON LED" function. This will make the LED of the faulty disk light up yellow.
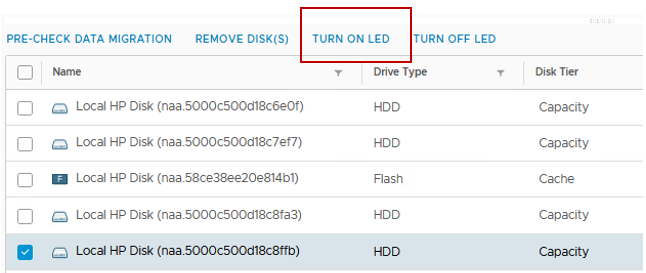
Fig. 6
3. Removing the defective disk from the disk group
Warning: Evacuate all VMs on the affected host and put the host into maintenance mode.
In "vCenter > vSAN > Disk Management", select the defective disk and click "REMOVE DISK(S)".
Confirm the removal of the disk by clicking the "REMOVE" button.
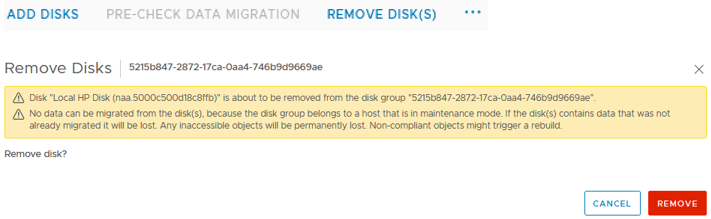
Fig. 7
The disk is now no longer assigned to the disk group and can be removed from the host in the next step.
4. Replacing the defective disk on the host
On the host, remove the defective disc and replace it with a new one.
5. Adding the new disk to the disk group
In "vCenter > vSAN > Disk Management", navigate to the "Claim Unused Disk" menu.
Add the new disk to the host and disk group. To do this, you select the "Capacity tier" menu item for the new disk.
Complete the process by clicking the "CREATE" button.
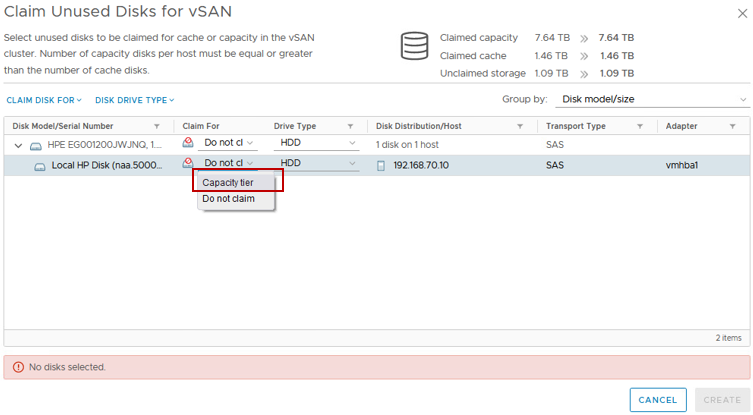
Fig. 8
After 60 minutes, the system starts a resync in the background of all vSAN objects. The duration of the resync varies according to the amount of data present.
You can continue working with the system during the resync. |
|
| Back to top |
|
 |
|
|
You cannot post new topics in this forum
You cannot reply to topics in this forum
You cannot edit your posts in this forum
You cannot delete your posts in this forum
You cannot vote in polls in this forum
|
Powered by phpBB © 2001, 2005 phpBB Group
Fa-ti si tu propriul forum GRATUIT, pe www.myforum.ro |
 FAQ
FAQ Search
 Memberlist
 Usergroups
 Register
 Profile
 Log in to check your private messages
 Log in


