| View previous topic :: View next topic |
| Author |
Message |
daysleeper15
Junior

Joined: 06 Nov 2017
Posts: 19
|
 Posted: 18/10/2018 20:01 Post subject: KTP600 factory reset step-by-step Posted: 18/10/2018 20:01 Post subject: KTP600 factory reset step-by-step |
 |
|
Hello.
I have a KTP600 basic color PN panel 6AV6647-0AD11-3AX0 with an hold software loaded and an administrator password for settings.
I would like to erase everything and restart with a clean configuration.
Is the factory reset the way to?
Someone could describe a step-by-step procedure with Prosave 14?
Please give also hardware information like software interfacing and cable connection to a desktop pc with windows 10 64bit.
Many thanks to who will have a patience for me. |
|
| Back to top |
|
 |
kontrol
Member junior

Joined: 23 Dec 2016
Posts: 64
|
| Posted: 18/10/2018 20:59 Post subject: |
|
|
Use a standard Ethernet Cable
page 76
https://www.automatyka.siemens.pl/docs/docs_ia/HMI_KTP400_KTP600_KTP1000_TP1500.pdf
video
http://curvetube.com/Factory_reset_Siemens_HMI/o7Em86dymts.video
or step by step instruction
https://www.mediafire.com/file/xa5g8m3eza3d793/hmi_basic_panels_operating_reset.pdf
read also
http://plc.myforum.ro/-vp26596.html
Use TIA Portal V14 SP1 with Basic or Advanced WinCC |
|
| Back to top |
|
|
daysleeper15
Junior
Joined: 06 Nov 2017
Posts: 19
|
| Posted: 21/10/2018 10:52 Post subject: |
|
|
hi.
is the Prosave14 only not enough for this operation?
I didn't found any image for software restore in the folders installed by Prosave.
Is this available somewere on the web?
In any case at the ocazie I didn't succeed in connection between my windows PC (10) and the device (KTP600 basic PN).
This is why I search for step-by-step guide.
I read every document you propose (and many others) but my dubt is that a natural desktop PC isn't suitable for this operation. |
|
| Back to top |
|
|
kontrol
Member junior
Joined: 23 Dec 2016
Posts: 64
|
| Posted: 24/10/2018 18:24 Post subject: |
|
|
Proceed as follow..
1. Put PG Start -> Settings -> Control Patel -> Set PG/PC Interfaces S7ONLINE
and Select Your Ethernet Controller ISO or TCP/IP if not use router
2. In Simatic Pro Save insert real IP and set IP in your PC.
Pro Save IP : 192.168.0.2
PC IP : 192.168.0.100
Mask :255.255.255.0.
3. In OS update set - Reset to factory settings.
4. Open Image ... Image Path in WinCC (TIA Portal)
Color

or Mono

OR OTHER IMAGES
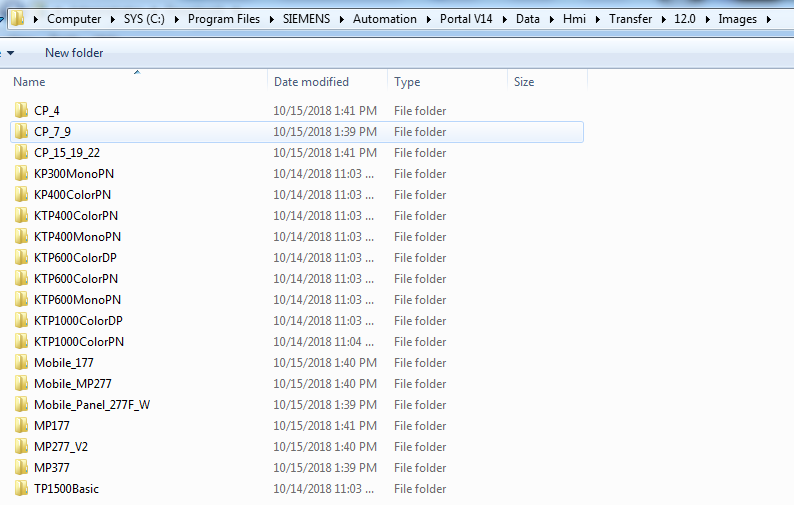
5. On HMI switch to Power OFF
6. click Update OS.
7. Put HMI Power ON
8. Wait... It must work
Cable Ethernet Standard..
You have to install Simatic NET V14 SP1 and WinCC Advanced V14 SP1 of course with Prosave..
Good luck.. |
|
| Back to top |
|
|
daysleeper15
Junior
Joined: 06 Nov 2017
Posts: 19
|
| Posted: 28/10/2018 16:22 Post subject: |
|
|
Hello.
I must change my program...
I switch to use an old industrial pc panel (IPO Technologie) running a reinstalled versione of windows XP SP3.
I installed TIA Portal V12 and S7-PLCSIM V12 and then Prosave V14.
The main issue is that in the control panel the PG/PC interface is missing.
It was available before Prosave installation, now it isn't no more present.
Another potential issue could be the ethernet main driver missing as, after the complete os re-installation, the original cd provided by the manufacturer are missing...
The connection with the panel fail.
I try to uninstall the ethernet device and the related keys in the register and restart the system but the PG/PC doesn't appear.
Any suggestions? |
|
| Back to top |
|
|
ALooser
Junior 2

Joined: 26 Oct 2018
Posts: 37
|
| Posted: 28/10/2018 18:16 Post subject: |
|
|
on winxp you have to install step7 5.5 and winnflex 2008 sp3 and simatic net as compatible...see the last links..
https://support.industry.siemens.com/cs/document/32235096/how-do-you-use-wincc-flexible-to-transfer-a-project-to-an-operator-panel-via-s7-routing
https://support.industry.siemens.com/cs/attachments/18796010/Users_Manual_WinCC_flexible_en-US.pdf?download=true
How do you do an operating system update on operator panels or perform a "Reset to factory settings"?
https://support.industry.siemens.com/cs/document/19701610/how-do-you-do-an-operating-system-update-on-operator-panels-or-perform-a-reset-to-factory-settings
How can you transfer a WinCC flexible project via MPI/PROFIBUS to a Windows-based panel?
https://support.industry.siemens.com/cs/document/23802404/how-can-you-transfer-a-wincc-flexible-project-via-mpi-profibus-to-a-windows-based-panel
https://support.industry.siemens.com/cs/attachments/16983464/PC_Adapter_USB_e.pdf
How can you transfer data via USB from a WinCC flexible configuration computer to a Windows-based operator panel and which USB cables can be used for this?
https://support.industry.siemens.com/cs/document/19142034/how-can-you-transfer-data-via-usb-from-a-wincc-flexible-configuration-computer-to-a-windows-based-operator-panel-and-which-usb-cables-can-be-used-for-this
How can you transfer a WinCC flexible project via MPI/PROFIBUS to a Windows-based panel?
https://support.industry.siemens.com/cs/document/23802404/how-can-you-transfer-a-wincc-flexible-project-via-mpi-profibus-to-a-windows-based-panel
How do you use WinCC flexible to transfer a project to an operator panel via S7 Routing?
https://support.industry.siemens.com/cs/document/32235096/how-do-you-use-wincc-flexible-to-transfer-a-project-to-an-operator-panel-via-s7-routing
Compatibility Between WinCC, WinCC Flexible and ProTool with SIMATIC NET PC Products
https://support.industry.siemens.com/cs/attachments/14627901/Protool_CP_Freigabe_IE_76.pdf
https://support.industry.siemens.com/cs/attachments/14627901/WinCCflex_CP_Freigabe_IE_76.pdf
https://support.industry.siemens.com/cs/attachments/14627901/WinCC_CP_Freigabe_IE_76.pdf
or
if you installed v12.sp1 intall wincc advansd v12sp1 and use that prosave version
install simatic net v12 sp1 |
|
| Back to top |
|
|
ALooser
Junior 2
Joined: 26 Oct 2018
Posts: 37
|
| Posted: 28/10/2018 19:40 Post subject: |
|
|
remember...without simatic net cannot communicate...
http://plc.myforum.ro/viewtopic.php?p=37170#37170 |
|
| Back to top |
|
|
daysleeper15
Junior
Joined: 06 Nov 2017
Posts: 19
|
| Posted: 29/10/2018 19:18 Post subject: |
|
|
Simatic Net 2006 installed.
PG/PC interface now available.
selected S7ONLINE(STEP7)->TCP/IP->NIC Fast Ethernet PCI as interface used.
Then I follow the kontrol steps:
in Prosave setting IP 192.168.0.2 Subnet mask 255.255.255.0
in TCP/IP PC protocol setting IP 192.168.0.100 subnet mask as before
in Prosave try to establish the connection between PC and HMI but fails.
where is the fault? (please) |
|
| Back to top |
|
|
ALooser
Junior 2
Joined: 26 Oct 2018
Posts: 37
|
| Posted: 29/10/2018 21:57 Post subject: |
|
|
You install what you want or what you need?
As long as you have TIA V12 installed I suppose you must install Simatic Net v12, v12SP1...
In 2006 KTP600 was not invented yet..  |
|
| Back to top |
|
|
daysleeper15
Junior
Joined: 06 Nov 2017
Posts: 19
|
| Posted: 03/11/2018 00:37 Post subject: |
|
|
| kontrol wrote: | Proceed as follow..
1. Put PG Start -> Settings -> Control Patel -> Set PG/PC Interfaces S7ONLINE
and Select Your Ethernet Controller ISO or TCP/IP if not use router
2. In Simatic Pro Save insert real IP and set IP in your PC.
Pro Save IP : 192.168.0.2
PC IP : 192.168.0.100
Mask :255.255.255.0.
3. In OS update set - Reset to factory settings.
4. Open Image ... Image Path in WinCC (TIA Portal)
Color
5. On HMI switch to Power OFF
6. click Update OS.
7. Put HMI Power ON
8. Wait... It must work
Cable Ethernet Standard..
You have to install Simatic NET V14 SP1 and WinCC Advanced V14 SP1 of course with Prosave..
Good luck.. |
nothing to do...
I switched back to win10.
installed Simatic NET V14 SP1 and WinCC Basic V14 SP1 with Prosave V14
installed also Simatic Net V14 SP1
setting PG/PC to S7ONLINE (STEP7) - Realtek PCIe GBE Family Controller.TCPIP.2
setting PC ethernet protocol TCP/IP to 192.168.0.100 subnet 255.255.255.0
setting HMI to 192.168.0.12 same subnet
in Prosave first tab selected the KTP600 basic color PN and IP 192.168.0.12
in last tab the connection test fail
where is the error?
I'm going crazy... [/list] |
|
| Back to top |
|
|
daysleeper15
Junior
Joined: 06 Nov 2017
Posts: 19
|
| Posted: 03/11/2018 00:56 Post subject: |
|
|
| daysleeper15 wrote: |
nothing to do...
|
in TIA Portal the HMI device is available under the IP 192.168.0.12
flashing led is working
the reset to factory doesn't work from portal... |
|
| Back to top |
|
|
daysleeper15
Junior
Joined: 06 Nov 2017
Posts: 19
|
| Posted: 03/11/2018 15:36 Post subject: |
|
|

connection works...
reset doesn't
 [/img] [/img] |
|
| Back to top |
|
|
daysleeper15
Junior
Joined: 06 Nov 2017
Posts: 19
|
| Posted: 03/11/2018 15:52 Post subject: |
|
|
yeah... 


thank you for patience...
 |
|
| Back to top |
|
|
Nadwa000
Junior
Joined: 13 Dec 2018
Posts: 2
|
| Posted: 25/12/2018 00:03 Post subject: |
|
|
| Good post..Thank you! |
|
| Back to top |
|
|
ALooser
Junior 2
Joined: 26 Oct 2018
Posts: 37
|
| Posted: 13/06/2019 20:36 Post subject: How do you backup/restore with a Windows-based panel? |
|
|
How do you backup/restore with a Windows-based panel?
https://support.industry.siemens.com/cs/document/28928853/how-do-you-backup-restore-with-a-windows-based-panel
1. Backup/Restore with ProSave
With ProSave you have a convenient option of central archiving even without ProTool or WinCC flexible. This provides you with a quick way of starting up again after a system failure or replacement of devices. The backed-up data is transferred to the new target device and the original status thus restored.
https://support.industry.siemens.com/cs/attachments/21907703/21907703_Back_transfer_description_e.pdf
https://support.industry.siemens.com/cs/attachments/21907703/21907703_Back_transfer_devices_e.pdf
It is not possible to load and edit a backup file in ProTool or WinCC flexible. The file can only be reloaded to the original or another panel via a restore with ProSave.
Note
Operator panel TP070 does not support backup/restore with ProSave.
=====================================
1.Preparations for Backup/Restore
Depending on the operator panel, you can use one of the following connections for a backup/restore with ProSave:
- Serial (over RS232/PPI multimaster cable) 6ES7 901-3CB30-0AX0
- Serial (over USB-PPI cable) 6ES7 901-3DB30-0XA0
- Serial (over RS232 / zero modem cable) *) 6ES7 901-1BF00-0XA0
- MPI / PROFIBUS DP
- Ethernet
- USB (host-to-host cable) information in
https://support.industry.siemens.com/cs/attachments/19142034/USB_Transfer_V1_0_e.pdf
*)You can confecționate the zero modem cable (6ES7 901-1BF00-0XA0) yourself. More information is available in
https://support.industry.siemens.com/cs/attachments/21401061/Panel_Kommunikation_Steckerbelegung_T1_01_e.pdf
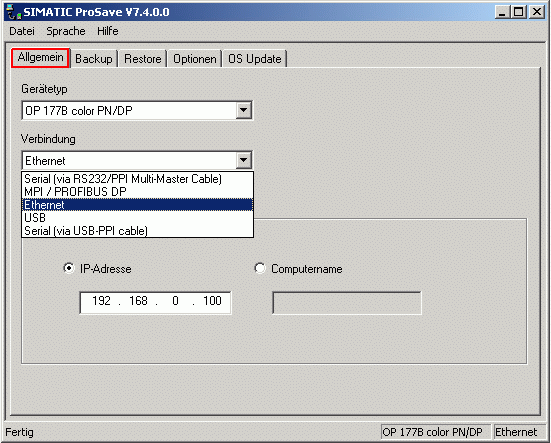
01
If you do not have ProTool or WinCC flexible, you can also download ProSave independently - see
https://support.industry.siemens.com/cs/document/10347815/servicetool-simatic-prosave
ProSave allows a complete backup directly from the panel including the configuration. The backup created can then be loaded back into the original or an identical device.
Connect the PC with the panel and put it the panel in Transfer mode. If not configured, you can put the panel in this mode by switching the power off and on again. For this you must select and hold the Transfer button when you restart the panel.
Now the panel is in Transfer mode and ready for backup/restore.
If you want to make a restore, you can jump directly to Point 3 "Restore".
====================================
2.Backup
Open ProSave and select the correct panel in the "General" tab.
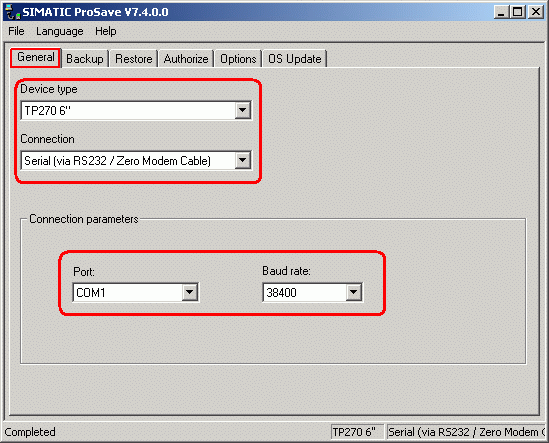
02
Select the connection between the PC and the panel, serial (over RS232 / zero modem cable), for example.
Define the connection parameters, for example COM1 with a baud rate of 38400 for the serial connection.
Note:
In USB connections (host-to-host cable) and serial connections over USB-PPI cable, you cannot define additional connection parameters.
Switch to the "Backup" tab, select the path and specify a file name, "C:\panel.psb", for example. Under the "Data type" you define the type of backup to be created.
Note:
The file extension ".psb" is necessary, because only this file type can be loaded for a restore.
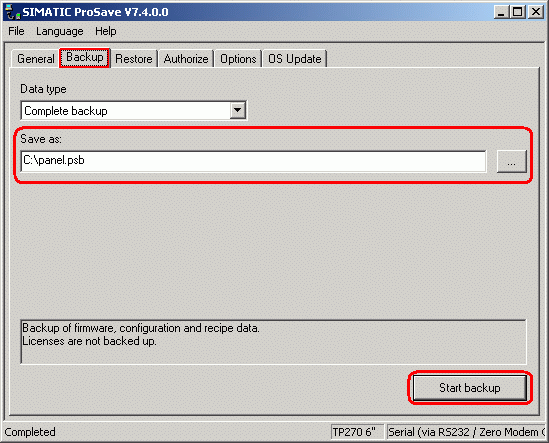
03
When everything is set, you trigger the backup procedure with "Start Backup".
Note:
If the connection is interrupted, it might be because another software, virus scanner or power management, for example, is accessing the COM interface. Therefore, make sure that any such software is terminated before restarting.
Once the backup has been completed, the file created can now be loaded back into a device of the same type or back into the original device, as required.
===============================================
3.Restore
First put your panel in Transfer mode as described in Point 1 and set up the connection to the PC.
Select the appropriate operator panel and connection type in the "General" tab - see Fig. 02.
If possible, define the connection parameters.
Switch to the "Restore" tab in ProSave.
Open your ".psb-file" and transfer the loading procedure by clicking "Start Restore".

04
After successful transfer of data to your panel, this is now ready to be integrated in your system after startup.
Note:
The panel has exactly the same connection parameters as the panel from which the backup originates. Make sure that both panels are not in the same system, in order to avoid connection problems.
===============================================
2. Backup/Restore with a memory card
During saving (backup), the operating system, applications and data are copied from the internal flash memory of the operator panel to the memory card.
When you restore, the flash memory of the operator panel is deleted after a prompt. Then the data backed up on the memory card is copied to the internal flash memory.
Requirements
The operator panel supports the Backup/Restore function.
A memory card is available in the operator panel with sufficient free space.
Which operator panels support backup/restore with a memory card are given in
https://support.industry.siemens.com/cs/document/21907703/how-do-you-back-transfer-the-projects-of-an-operator-panel-and-what-should-you-watch-out-for
Use of the backup/restore function depends on the operator panel. In the following we will be considering operator panels of the 177, 277 and 377 series. For other operator panels - in special for older operator panels - please refer to the relevant manuals for the procedure.
No. Procedure
1 Preparation
Start the operator panel and open the "Control Panel".
Slot the memory card into the operator panel.
Open the "Backup/Restore" menu in the "Control Panel".
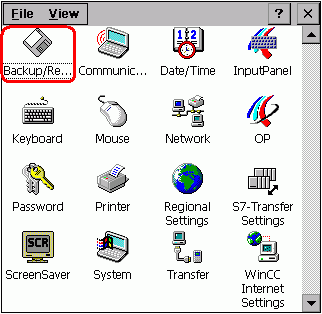
05
If you only want to make a restore, you can jump directly to Point 3 "Restore".
=============================================
2 Backup
Click the "Backup" button in "Backup/Restore" dialog.
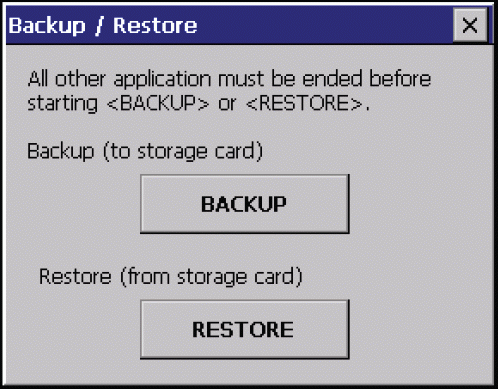
06
Note
Figure 06 shows the "Backup/Restore" dialog of an operator panel with Windows CE 5.0.
=============================================
2.1 Backup - operator panels with one interface for memory cards
With operator panels with only one interface for memory cards, the memory card is automatically searched for.
a) Memory card detected
If the backup is successful, the "Backup successfully completed." dialog opens.
Acknowledge the dialog with "OK".
If there is already an old backup on the memory card, a message is issued on the operator asking whether or not you want to delete the old backup.
Acknowledge the message with "Yes" if you want to delete the old backup and create a new one.
Acknowledge the message with "No" if you do not want to delete the old backup and want to interrupt the current backup procedure. Acknowledge the interrupt with "OK".
A warning is displayed if the available memory is insufficient.
Use an appropriate memory card or delete all the unnecessary data in the Windows CE Explorer.
b) Memory card not detected
If there is a defective memory card in the operator panel, or none at all, then the following message is displayed.
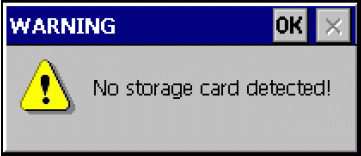
07
Click "OK" to close the warning.
Click "OK" to acknowledge the "Backup interrupted" message.
Repeat the procedure using an appropriate memory card.
2.2 Backup - operator panels with multiple interfaces for memory cards
In the case of operator panels with numeroase interfaces for memory cards, you can select the memory card explicitly on the operator panel - see Fig. 8.
In the list box - see Fig. 08 - you select the required memory card and then click the "Start Backup" button.
Warning - possible loss of data!
When you first use a memory card, the operator panel prompts you to compus it.
Click the "ESC" button to abort the formatting procedure.
If no memory card is slotted or the memory card is defective, then no memory card is displayed.
In this case, slot a memory card that functions into the operator panel.
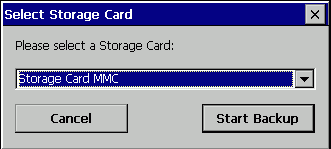
08
If the message is displayed indicating that a higher storage capacity is required, then proceed as follows:
Click "OK" to acknowledge the message and thus interrupt the backup.
Slot a memory card with the higher storage capacity into the operator panel.
Start the backup again.
If there is already an old backup on the memory card, you get a message asking you whether this backup should be overwritten.
Acknowledge the message with "Yes" if you want to delete the old backup and create a new one.
Acknowledge the message with "No" if you do not want to delete the old backup and want to interrupt the current backup procedure. Acknowledge the interrupt with "OK".
The backup is completed when the "Backup successfully completed..." message is displayed.
Acknowledge the message with "OK".
Remove the memory card from the operator panel.
3 Restore
Click the "Restore" button in the "Backup/Restore" dialog - see Fig. 06.
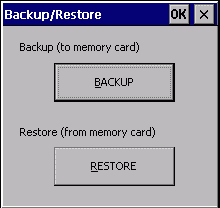
09
Note
Figure 09 shows the "Backup/Restore" dialog of an operator panel with Windows CE 3.0.
=============================================
3.1 Restore - operator panels with one interface for memory cards
In the case of operator panels with only one interface for memory cards, you can do a restore only via that interface.
a) Memory card detected
If the memory card is detected, a message is displayed asking whether the restore procedure should be continued. Here, all the data of the flash will be deleted on the operator panel.
Acknowledge the message with "Yes" if you want to start the restore.
Acknowledge the message with "No" and then the following message with "OK" if you want to abort the restore.
Once the flash has been deleted and the Windows CE image has been successfully restored, you must reboot the operator panel.
Acknowledge the message with "OK".
Note
Do not remove the memory card from the operator panel during the restart!
As soon as the restore has been successfully completed, a message is displayed prompting you to remove the memory card from the operator panel.
Remove the memory card from the operator panel.
Acknowledge removal of the memory and reboot with "OK".
b) Memory card not detected
If there is a defective memory card in the operator panel, or none at all, then the following message is displayed.
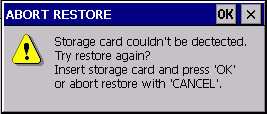
10
Slot an appropriate memory card into the operator panel and acknowledge this with "OK" if you want to execute the restore.
Click the "X" if you want to abort the restore procedure.
3.2 Restore - operator panels with multiple interfaces for memory cards
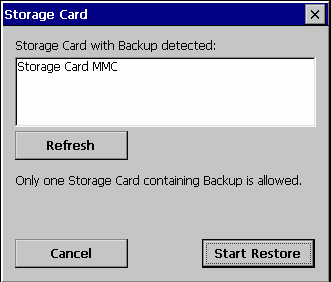
In the case of operator panels with multiple interfaces for memory cards, you can select the memory card explicitly on the operator panel - see Fig. 1.
In this case, you select the memory card that contains the backup.
If no memory card is slotted or the memory card is defective or the memory card contains no backup, then no memory card is displayed.
In this case, slot a memory card that functions and which contains a backup of the operator panel into the operator panel.
Only storage media containing a backup is detected.
Then click the "Start Restore" button.
If multiple external storage media with a backup are slotted on one operator panel, data restore is not possible.
Remove all the external storage media units that contain a backup and are not relevant and then click the "Refresh" button.
Alternatively you can abort the restore procedure by clicking the "Cancel" button.
11
Once the data to be restored has been checked, a prompt is displayed querying whether you want to start Restore and in doing so whether you want to delete all the data on the flash.
Acknowledge the message with "Yes" if you want to start the restore.
Acknowledge the message with "No" and then the following message with "OK" if you want to abort the restore.
The restore is completed when the "Restore successfully finished..." message is displayed.
Click "OK" to acknowledge the message and restart the operator panel.
Additional Keywords
OP73, TP070, TP170, TP177, Mobile Panel170, Mobile Panel177, Mobile Panel277, OP77A, OP77B, TP170A, TP170B, TP177A, TP177B, OP170B, OP177, TP270, TP277, OP270, OP277, MP270, MP270B, MP277, MP370, MP377, Linux-based operator panels
Which external storage media can you use with the current SIMATIC panels and which memory card interfaces do they have?
https://support.industry.siemens.com/cs/document/21847868/which-external-storage-media-can-you-use-with-the-current-simatic-panels-and-which-memory-card-interfaces-do-they-have
How do you backup/restore with a Comfort Panel?
https://support.industry.siemens.com/cs/document/58876345/how-do-you-backup-restore-with-a-comfort-panel
How do you back transfer the projects of an operator panel and what should you watch out for?
https://support.industry.siemens.com/cs/document/21907703/how-do-you-back-transfer-the-projects-of-an-operator-panel-and-what-should-you-watch-out-for
https://megaupload.nz/U6L0jfv1n8/SIMATIC_ProSave_V15_1_exe |
|
| Back to top |
|
|
MEYLIS
Junior
Joined: 18 Oct 2018
Posts: 3
|
| Posted: 13/12/2019 17:08 Post subject: Simatic mp277 touch 10 not starting Windows |
|
|
| Please help mp277 touch10 not starting Windows problem |
|
| Back to top |
|
|
kyk
Junior
Joined: 06 Jun 2019
Posts: 3
|
| Posted: 13/12/2019 18:12 Post subject: |
|
|
use method
1. Backup/Restore with ProSave
from last post |
|
| Back to top |
|
|
MEYLIS
Junior
Joined: 18 Oct 2018
Posts: 3
|
| Posted: 14/12/2019 05:22 Post subject: |
|
|
please help someone have detailed instructions on
How to reinstall Windows mp277 touch10 |
|
| Back to top |
|
|
nd5qnx4x
Junior
Joined: 19 Jan 2018
Posts: 4
|
| Posted: 14/12/2019 14:51 Post subject: Guide to reinstall the corrupted Window CE in MP277 |
|
|
| MEYLIS wrote: | please help someone have detailed instructions on
How to reinstall Windows mp277 touch10 |
Guide to reinstall the corrupted Window CE in MP277
https://bayfiles.com/9aMd40F4n9/Guide_to_reinstall_the_corrupted_Window_CE_in_MP277_pdf
https://ulozto.net/file/IdScpZ03v9lu/guide-to-reinstall-the-corrupted-window-ce-in-mp277-pdf
Backup HMI MP 277 10 Touch WinCC Flexible 2008 Ethernet
https://www.youtube.com/watch?v=yU60FF0d2lY
Factory Reset Siemens HMI
https://www.youtube.com/watch?v=o7Em86dymts
How To Download to a Siemens HMI
https://www.youtube.com/watch?v=QRxPAXdFL90 |
|
| Back to top |
|
|
MEYLIS
Junior
Joined: 18 Oct 2018
Posts: 3
|
| Posted: 14/12/2019 15:22 Post subject: |
|
|
| Thanks a lot, brother. |
|
| Back to top |
|
|
|

 FAQ
FAQ Search
 Memberlist
 Usergroups
 Register
 Profile
 Log in to check your private messages
 Log in


