 |
plc.myforum.ro
PLCs users www.plc.myforum.ro!
|
| View previous topic :: View next topic |
| Author |
Message |
ctor
Junior

Joined: 05 Jun 2018
Posts: 7
|
 Posted: 27/12/2022 12:26 Post subject: Import PDLs WinCC Posted: 27/12/2022 12:26 Post subject: Import PDLs WinCC |
 |
|
Hi all,
Would you know how to translate to a graphic screen PDL file of WinCC from an human understandable language (XML, CSV, JSON)?
Thank you very much. |
|
| Back to top |
|
 |
Balboat
Junior
Joined: 03 Dec 2022
Posts: 5
|
| Posted: 27/12/2022 14:56 Post subject: import data in the XML compus with WinCC (TIA Portal) |
|
|
How do you export and import data in the XML compus with WinCC (TIA Portal) Runtime Advanced?
https://support.industry.siemens.com/cs/document/109740374/
Using Visual Basic scripts you can read or store any process data of WinCC RT Advanced as XML files and later process them in other applications like Microsoft Excel, for example. This FAQ response shows you the necessary configuration and programming steps.
XML ("Extensible Markup Language") is a widely used human-readable and machine-readable format for universal data exchange. WinCC (TIA Portal) Runtime supports the XML format via "XML DOM" objects that are accessed with Visual Basic scripts.
In this FAQ response we give three examples of how you can use VBS to store the tags "Material", "Pressure" and "Temperature" from the Tag Management of the Runtime in XML files and read them again. The sample project available for downloading links the scripts with a configuration and demonstrates their practical application.
Note
In some commands the scripts use the underscore "_" as last character of a code line to indicate that the command used is continued in the next line.
In order to show a quotation mark in a string, the quotation mark has to be doubled in the assignment; this means that x= "It is a ""Comfort Panel""." leads to x being displayed as It is a "Comfort Panel". (So-called "Escaping").
Script "Write_XML_to_File_with_XML"

Fig. 01
With this script you write the values for the three tags "Material", "Pressure" and "Temperature" to the file "c:\65_XML\test.xml". The methods of the "XML DOM" object are used to făcute the XML file. The functions:
Line 8: Creates the "XML DOM" object "XMLo".
Line 9/10: Creates a child "root" that is integrated in the "XMLo".
Line 12/13: Creates a child "property" that is inserted under "root".
Line 15/16: A word pair "value"/"name" containing the value and name of the tag is inserted in "Property".
The action is repeated in the following lines for the tags "Pressure" and "Temperature". Here you enter the name of your own tag to save it in the XML file.
Line 37/38: Inserts a header that identifies the file as an XML file.
Line 40: Saves the XML file

Fig. 02
This script works like "Write_XML_to_File_with_XML" but here the file is added "manually". This permits greater flexibility when creating, but demands more time and care when configuring.
Line 8ff: Creates a file object "fso" and runs error monitoring.
Line 15: Assigns the file name "FileName" to "fso".
Line 24: Opens the file as text file in "append" mode on the data carrier.
Line 33: Writes the file header for identification as XML file.
Line 34: Stores the "root" object in the file.
Line 35/36: Stores the name and value of "Material" as "property" attribute under "root" in file.
The steps are repeated in the following for "Pressure" and "Temperature". Replace these lines with names and values of your own tags. Here you should make sure that quotation marks are correctly coded and opening and closing tags ( for example, "<property>") are correctly combined with each other.
Line 44: Closes the file on the data carrier.
The XML file generated in this way is identical in function to that generated with the previous script.

Fig. 03
The "Read_XML_from_File" script is used to read in an XML file and the name/value pairs stored in it are assigned to the Runtime tags. An "XML DOM" object is used again for the function.
Line 8: Creates an "XML DOM" object "XMLo".
Line 10: Loads the XML file into the object "XMLo".
Line 12: The "root" element of the "XML-DOM" object is assigned to "XMLroot".
Lines 14-20: Reads out the information from the XML object and transfers it to the Tag Management of the RT.
Here the script uses the "For Each..." construct to iterate the loop over all the "children" of the XML object that are found. For each name/value pair found (attributes "name" and "value") the value is copied into the tag with the corresponding name.
Note
If a tag name that is not defined in the Runtime is found in the XML file, this leads to a runtime error. Make sure that all the tag names used in the XML file are also in your configuration.
Lines 22ff: Interception of errors
Sample project
The three tags "Material", "Pressure" and "Temperature" were created in the sample project and the three scripts were linked with corresponding buttons.

Fig. 04
Proceed as follows to configure:
Enter the values for "Material" (WString), "Pressure" (Int) and "Temperature" (Real) in the corresponding input/output fields. Terminate each of your entries with "Return".
If necessary, change the path and name of the XML file to be written/read in the input/output field. (Effective only with "Write to disk (manual)").
Click the "Write to disk (manual)" button to save the current values of the three tags on the data carrier via the "Write _XML_to_File" script.
Click the "Write to disk (XML)" button to save the current values of the three tags on the data carrier via the "Write _XML_to_File_with_XML" script.
Click the "Read from disk" button to read the values of the tags stored in the XML file and transfer them to the Tag Management of the Runtime.
Click the "Exit" button to terminate the Runtime.
Example of a generated XML file

Fig. 05
Note
The solution presented here is generally also applicable for use with WinCC (TIA Portal) RT Professional and operator panels that support scripting. However, note that the syntax of the VBS commands has to be changed according to the version of RT/Windows used.
Download
Archived sample project for WinCC (TIA Portal) Advanced
https://support.industry.siemens.com/cs/attachments/109740374/109740374_ReadWrite_to_File_Arch_TIAV15.1.zip
https://gofile.cc/4QN/109740374-readwritetofilearchtiav151.zip |
|
| Back to top |
|
|
Balboat
Junior
Joined: 03 Dec 2022
Posts: 5
|
| Posted: 27/12/2022 14:58 Post subject: SIMATIC WinCC Open Architecture Version 3.18 Documentation |
|
|
SIMATIC WinCC Open Architecture Version 3.18 Documentation
https://www.winccoa.com/documentation/WinCCOA/3.18/en_US/XML_panel_format/XML_panel_format-03.html |
|
| Back to top |
|
|
Balboat
Junior
Joined: 03 Dec 2022
Posts: 5
|
| Posted: 27/12/2022 15:11 Post subject: TIA Portal Openness: Introduction and Demo Application |
|
|
TIA Portal Openness: Introduction and Demo Application
https://support.industry.siemens.com/cs/document/108716692/
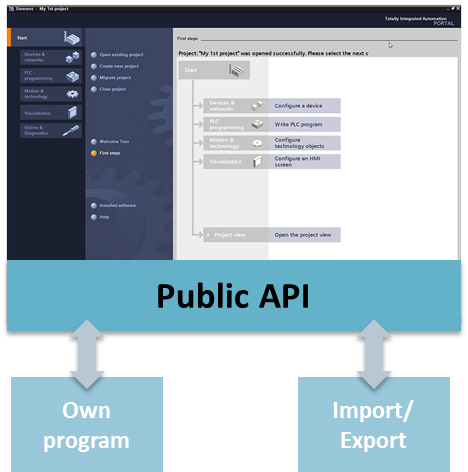
The API interface for WinCC and STEP 7 in the TIA Portal enables the TIA Portal to be integrated into your development environment to automate your engineering tasks. You can use external development environments to create your own applications, e.g. a code generator for HMI images and PLC software blocks.
Description
From STEP 7 or WinCC V13 SP1 onward, TIA Portal Openness is included in the delivery of STEP 7 or WinCC in TIA Portal.
This enables you to program the applications which automate the engineering in TIA Portal.
Documentation and projects for TIA Portal V15.1
https://support.industry.siemens.com/cs/attachments/108716692/108716692_TIA_Openness_GettingStartedAndDemo_V15_1_en.pdf
https://support.industry.siemens.com/cs/attachments/108716692/108716692_StartOpenness_V15_1.zip
https://support.industry.siemens.com/cs/attachments/108716692/108716692_StartOpennessVB_V15_1.zip
https://support.industry.siemens.com/cs/attachments/108716692/108716692_TiaPortalOpennessDemo_V15_1.zip
Documentation and projects for TIA Portal V14 SP1
https://support.industry.siemens.com/cs/attachments/108716692/108716692_TIA_Openness_GettingStartedAndDemo_V14SP1_en.pdf
https://support.industry.siemens.com/cs/attachments/108716692/108716692_StartOpenness_V14SP1.zip
https://support.industry.siemens.com/cs/attachments/108716692/108716692_StartOpennessVB_V14SP1.zip
https://support.industry.siemens.com/cs/attachments/108716692/108716692_TiaPortalOpennessDemo_V14SP1.zip
Instructions for the use at TIA Portal V16 and newer
The precompiled OpennessDemo under „\bin\Release” in the Visual Studio Project can directly be used from Openness version newer than V15.1.
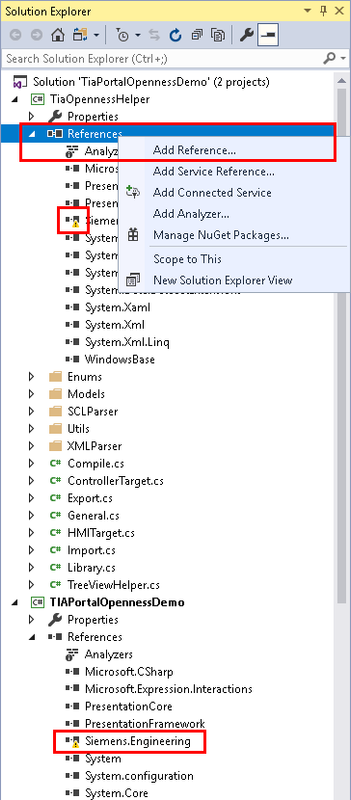
If the Openness application needs to be compiled again, the reference to the Siemens.Engineering.dll has to be updated.
Have a right-click to “References”, choose “Add Reference”. Use “Browse” in the next dialog/window to select the file under „C:\Program Files\Siemens\Automation\Portal V16\PublicAPI\V15.1\Siemens.Engineering.dll“ (the default path may differ). Adapt it for both projects “TiaOpennessHelper“ and „TIAPortalOpennessDemo“.
https://gofile.cc/Oza/108716692-tiaportalopennessdemov14sp1.zip
https://gofile.cc/3zO/108716692-startopennessvbv14sp1.zip
https://gofile.cc/N3V/108716692-startopennessv14sp1.zip
https://gofile.cc/KjN/108716692-tiaopennessgettingstartedanddemov14sp1en.pdf
https://gofile.cc/1za/108716692-startopennessvbv151.zip
https://gofile.cc/zYg/108716692-tiaportalopennessdemov151.zip
https://gofile.cc/0lN/108716692-startopennessv151.zip
https://gofile.cc/D0J/108716692-tiaopennessgettingstartedanddemov151en.pdf
https://gofile.cc/xYW/tiaportalopennessenus-en-us.pdf |
|
| Back to top |
|
|
Balboat
Junior
Joined: 03 Dec 2022
Posts: 5
|
| Posted: 27/12/2022 15:29 Post subject: HMI design with the HMI Template Suite |
|
|
HMI design with the HMI Template Suite
https://support.industry.siemens.com/cs/document/91174767/
HMI Template Suite for SIMATIC WinCC Unified V17
HMI Template Suite for SIMATIC WinCC Basic/Comfort/Advanced V17
Older WinCC (TIA Portal) templates
https://gofile.cc/27n/91174767-lhmitemplatesuitev15code.zip
https://gofile.cc/nab/91174767-hmitemplatesuitev151codev2.zip
https://gofile.cc/gDy/91174767-hmitemplatesuitev15docv1en.pdf
https://gofile.cc/9zW/91174767-hmitemplatesuitev151docv21en.pdf
https://gofile.cc/bOa/91174767-hmitemplatesuitev16docv3en.pdf
https://gofile.cc/oOO/91174767-hmitemplatesuitelibrariesv16code.zip
https://gofile.cc/B4Y/91174767-hmitemplatesuiteadvancedlibv17.zip
https://gofile.cc/ago/91174767-hmitemplatesuitedocv4en.pdf
https://gofile.cc/Exd/91174767-hmitemplatesuitewizardv201setup.zip
https://gofile.cc/qYX/91174767-hmitemplatesuitewinccunifiedv31.zip |
|
| Back to top |
|
|
Balboat
Junior
Joined: 03 Dec 2022
Posts: 5
|
| Posted: 27/12/2022 16:00 Post subject: Toolbox for HMI Projects |
|
|
Toolbox for HMI Projects
https://support.industry.siemens.com/cs/document/106226404/
It is often the small tools that make work easier. This entry contains some useful tools that you can easily integrate into your HMI configuration via libraries. For example, a stopwatch, a file explorer or also a calculator, .... The toolbox for HMI projects currently offers 29 tools already and is continuously expanded.
The HMI toolbox of Siemens Industry Online Support provides many useful tools that can clearly make every day work easier.
The different tools are available in global libraries and can thus be easily integrated in your visualization. This saves you valuable development time that you would have to invest in the development of separate tools.
The HMI toolbox comprises tools for six different subject areas.
https://i.postimg.cc/XvXFPTRG/106226404-HMI-Toolbox-01-en.png
All tools in one example
In the example project you can test the functions of all tools. In order to use them in your own project, use the respective libraries and documentation.
https://gofile.cc/RaB/libraries-panelswinccadvancedv14sp1.zip
https://gofile.cc/7zW/106226404-lhmitoolboxwincccomfortadvv15.zip
https://gofile.cc/XzQ/exampleproject-panelswinccadvancedv14sp1.zip
https://gofile.cc/PP7/106226404-hmitoolboxwincccomfortadvv15.zip
https://gofile.cc/Zzp/libraries-winccprofessionalv14sp1.zip
https://gofile.cc/YzN/exampleproject-winccprofessionalv14sp1.zip
https://gofile.cc/lZV/106226404-lhmitoolboxwincccomfortadvv151.zip
https://gofile.cc/jOd/106226404-hmitoolboxwincccomfortadvv151.zip
https://gofile.cc/Q3d/documentations-v14en.zip
https://gofile.cc/WqL/106226404-hmitoolboxwinccprofessionalv15.zip
https://gofile.cc/ezX/106226404-lhmitoolboxwinccprofessionalv15-1.zip
https://gofile.cc/5YL/106226404-hmitoolboxwinccprofessionalv15docen.pdf
https://gofile.cc/ezX/106226404-lhmitoolboxwinccprofessionalv15.zip
https://gofile.cc/yYP/106226404-lhmitoolboxwincccomfortadvcodev16.zip
https://gofile.cc/pYX/106226404-hmitoolboxwincccomfortadvcodev16.zip
https://gofile.cc/dR6/106226404-hmitoolboxwincccomfortadvv15docen.pdf
https://gofile.cc/J3l/106226404-lhmitoolboxwinccprofessionalv151.zip
https://gofile.cc/6zJ/106226404-hmitoolboxwinccprofessionalv151docen.pdf
https://gofile.cc/Aj8/106226404-hmitoolboxwincccomfortadvv151docen.pdf
https://gofile.cc/LEq/106226404-hmitoolboxwinccprofessionalv151.zip
https://gofile.cc/Vzg/106226404-hmitoolboxwincccomfortadvv16docen.pdf
https://gofile.cc/84z/106226404-hmitoolboxwincccomfortadvcodev17.zip
https://gofile.cc/rY5/106226404-siemensiconfont.zip
https://gofile.cc/kqV/106226404-lhmitoolboxwincccomfortadvcodev17.zip
https://gofile.cc/mOo/hmieng.zip
https://gofile.cc/40N/106226404-lhmitoolboxwinccprofessionalv17.zip
https://gofile.cc/3VO/106226404-hmitoolboxwinccprofessionalv17docen.pdf
https://gofile.cc/Oxa/106226404-hmitoolboxwinccprofessionalv17.zip
https://gofile.cc/NXV/106226404-hmitoolboxwincccomfortadvv17docen.pdf |
|
| Back to top |
|
|
Armadillo43
Junior
Joined: 02 Oct 2018
Posts: 2
|
| Posted: 27/12/2022 17:04 Post subject: Re: Import PDLs WinCC |
|
|
| ctor wrote: | Hi all,
Would you know how to translate to a graphic screen PDL file of WinCC from an human understandable language (XML, CSV, JSON)?
Thank you very much. |
Copy graphics and
VBA script to export all the properties and Tag connection(direct) in to a Excel sheet
| Code: | Sub ExportAllProperties()
Dim HMIObj As HMIObject
Dim HMIDoc As Document
Dim Properties As HMIProperties
Dim Property As HMIProperty
Dim VarTriggerName As HMIVariableTrigger
Dim nObjects
Dim ObjectName, FileName, FilePath As String
Dim FSO As Object
Dim objFolder, objFile As Object
Dim objExcel As Excel.Application
Dim objWBook As Excel.Workbook
Dim objWSheet As Excel.Worksheet
Dim Row As Long, lColumn As Long
Set FSO = CreateObject("Scripting.FileSystemObject")
FilePath = "C:\XYZ\FilesToExport\"
Set objFolder = FSO.GetFolder(FilePath)
Set objExcel = CreateObject("Excel.Application")
Set objWBook = objExcel.Workbooks.Add()
objWBook.SaveAs objFolder & "\Export.xlsx"
Set objWSheet = objWBook.Worksheets.Add
objWSheet.Name = "Properties"
Row = 1
objWSheet.Cells(Row, 1) = "FileName"
objWSheet.Cells(Row, 2) = "ObjectName"
objWSheet.Cells(Row, 3) = "PropertyName"
objWSheet.Cells(Row, 4) = "PropertyType"
objWSheet.Cells(Row, 5) = "PropertyValue"
objWSheet.Cells(Row, 6) = "TagName"
objWSheet.Cells(Row, 7) = "UpdateCycle"
On Error GoTo ErrorLoop
For Each objFile In objFolder.Files
FileName = objFile.Name
If (UCase(FileName) Like "@*.PDL") Then
Application.Documents.Open (FilePath & FileName)
Set HMIDoc = Application.ActiveDocument
nObjects = HMIDoc.HMIObjects.Count
For n = 1 To nObjects
Set HMIObj = HMIDoc.HMIObjects.Item(n)
For Each objProperty In HMIObj.Properties
Row = Row + 1
objWSheet.Cells(Row, 1) = FileName
objWSheet.Cells(Row, 2) = HMIObj.ObjectName
objWSheet.Cells(Row, 3) = objProperty.Name
objWSheet.Cells(Row, 4) = TypeName(objProperty.value)
If Not IsEmpty(objProperty.value) Then
objWSheet.Cells(Row, 5) = objProperty.value
End If
If objProperty.IsDynamicable And Not objProperty.Dynamic Is Nothing Then
Select Case objProperty.Dynamic.DynamicStateType
Case hmiDynamicStateTypeVariableDirect 'Direct Tag is connected
Set VarTriggerName = objProperty.Dynamic
objWSheet.Cells(Row, 6) = VarTriggerName.VarName
objWSheet.Cells(Row, 7) = VarTriggerName.CycleType
'Case hmiDynamicStateTypeDynamicDialog 'Dynamic Dialog is used
'Case hmiDynamicStateTypeScript 'Direct script is used
'Case hmiDynamicStateTypeVariableIndirect 'Indirect Tag is connected
End Select
Else
objWSheet.Cells(Row, 6) = "-"
objWSheet.Cells(Row, 7) = "-"
End If
Next
Next
Application.ActiveDocument.Close
End If
Next
With objExcel.ActiveSheet
.Rows(1).Font.Bold = True
.UsedRange.AutoFilter
lColumn = .UsedRange.Column + .UsedRange.Columns.Count - 1
.Range(.Cells(1, 1), .Cells(1, lColumn)).Interior.ColorIndex = 40
.Rows(1).AutoFit
.Columns.AutoFit
With .UsedRange.Borders
.LineStyle = xlContinuous
.Color = vbBlack
.Weight = xlThin
End With
End With
Set objWSheet = Nothing
objWBook.Save
objWBook.Close
Set objWBook = Nothing
objExcel.Quit
Set objExcel = Nothing
Exit Sub
ErrorLoop:
Debug.Print Err.Description
End Sub |
and scripts
| Code: | Sub ExportAllScripts()
Dim HMIObj As HMIObject
Dim HMIDoc As Document
Dim HMIScript As HMIScriptInfo
Dim Properties As HMIProperties
Dim Property As HMIProperty
Dim nObjects, nEvents, m, n, p, i As Integer
Dim ObjectName, ProjectDir, FileName, Element As String
Dim fso, MyFile
Dim objFile As Object
Dim objFolder As Object
'Dim DynTrig As HMIDynamicDialog
'Dim TagTrig As HMIVariableTriggers
'Dim VarTrig As HMIVariableTrigger
Set fso = CreateObject("Scripting.FileSystemObject")
Set MyFile = fso.CreateTextFile(Application.ApplicationDataPath & "ExportedScriptsEvents.txt", True)
ProjectDir = Application.ApplicationDataPath
Set objFolder = fso.GetFolder(ProjectDir)
On Error GoTo ErrorLoop
For Each objFile In objFolder.Files
FileName = objFile.Name
If (UCase(FileName) Like "@*PDL") Then
Application.Documents.Open (FileName)
Set HMIDoc = Application.ActiveDocument
nObjects = HMIDoc.HMIObjects.Count
For n = 1 To nObjects
Set HMIObj = HMIDoc.HMIObjects.Item(n)
ObjectName = HMIObj.ObjectName
nEvents = HMIObj.Events.Count
For m = 1 To nEvents
If (HMIObj.Events.Item(m).Actions.Count > 0) Then
Select Case HMIObj.Events.Item(m).Actions.Item(1).ActionType
Case hmiActionTypeScript
MyFile.WriteLine FileName & vbCrLf & HMIObj.ObjectName & vbCrLf & HMIObj.Events.Item(m).EventName & vbCrLf & HMIObj.Events.Item(m).Actions.Item(1).SourceCode & vbCrLf & "============================" & vbCrLf
Case hmiDynamicStateTypeDynamicDialog
Case hmiDynamicStateTypeVariableDirect, hmiDynamicStateTypeVariableIndirect
Case hmiDynamicStateTypeNoDynamic
End Select
End If
Next
For Each objProperty In HMIObj.Properties
If objProperty.IsDynamicable And Not objProperty.Dynamic Is Nothing Then
Select Case objProperty.Dynamic.DynamicStateType
Case hmiDynamicStateTypeScript
Set HMIScript = objProperty.Dynamic
MyFile.WriteLine FileName & vbCrLf & HMIObj.ObjectName & "--->" & "ActionType - " + CStr(HMIScript.ActionType)
MyFile.WriteLine objProperty.Name & "--->" & "SourceCode - " + CStr(HMIScript.SourceCode) & "=============="
End Select
End If
Next
Next
Application.ActiveDocument.Close
End If
Next
MyFile.Close
Exit Sub
ErrorLoop:
Debug.Print Err.Description
End Sub |
direct links
| Code: | Sub ExportAllScripts()
Dim HMIObj As HMIObject
Dim HMIDoc As Document
Dim HMIScript As HMIScriptInfo
Dim Properties As HMIProperties
Dim Property As HMIProperty
Dim VarTriggerName As HMIVariableTrigger
Dim VarLinkTag2 As HMIVariableTrigger
Dim nObjects, nEvents, m, n, p, i As Integer
Dim ObjectName, ProjectDir, FileName, Element As String
Dim fso, MyFile
Dim objFile As Object
Dim objFolder As Object
'Dim DynTrig As HMIDynamicDialog
'Dim TagTrig As HMIVariableTriggers
'Dim VarTrig As HMIVariableTrigger
Set fso = CreateObject("Scripting.FileSystemObject")
Set MyFile = fso.CreateTextFile(Application.ApplicationDataPath & "ExportedScriptsEvents.txt", True)
'ProjectDir = Application.ApplicationDataPath
Set objFolder = fso.GetFolder("E:\PCS7_Projects")
On Error GoTo ErrorLoop
For Each objFile In objFolder.Files
FileName = objFile.Name
If (UCase(FileName) Like "*.PDL") Then
Application.Documents.Open (FileName)
Set HMIDoc = Application.ActiveDocument
nObjects = HMIDoc.HMIObjects.Count
For n = 1 To nObjects
Set HMIObj = HMIDoc.HMIObjects.Item(n)
For Each objProperty In HMIObj.Properties
If objProperty.IsDynamicable And Not objProperty.Dynamic Is Nothing Then
Select Case objProperty.Dynamic.DynamicStateType
Case hmiDynamicStateTypeVariableDirect
Set VarTriggerName = objProperty.Dynamic
'Case hmiDynamicStateTypeDynamicDialog
'Case hmiDynamicStateTypeScript
'Case hmiDynamicStateTypeVariableIndirect
MyFile.WriteLine FileName & ";" & HMIObj.ObjectName & ";" & objProperty.Name & ";" & VarTriggerName.VarName & ";" & CStr(VarTriggerName.CycleType)
End Select
End If
Next
Next
Application.ActiveDocument.Close
End If
Next
MyFile.Close
Exit Sub
ErrorLoop:
Debug.Print Err.Description
End Sub |
|
|
| Back to top |
|
|
|
|
You cannot post new topics in this forum
You cannot reply to topics in this forum
You cannot edit your posts in this forum
You cannot delete your posts in this forum
You cannot vote in polls in this forum
|
Powered by phpBB © 2001, 2005 phpBB Group
Fa-ti si tu propriul forum GRATUIT, pe www.myforum.ro |
 FAQ
FAQ Search
 Memberlist
 Usergroups
 Register
 Profile
 Log in to check your private messages
 Log in


