 |
plc.myforum.ro
PLCs users www.plc.myforum.ro!
|
| View previous topic :: View next topic |
| Author |
Message |
gaty
Member


Joined: 01 Mar 2017
Posts: 188
|
 Posted: 07/11/2018 13:28 Post subject: How do you have bit alarms generated automatically in WinCC Posted: 07/11/2018 13:28 Post subject: How do you have bit alarms generated automatically in WinCC |
 |
|
How do you have bit alarms generated automatically in WinCC (TIA Portal) Basic/Comfort/Advanced?
https://support.industry.siemens.com/cs/document/91435077/how-do-you-have-bit-alarms-generated-automatically-in-wincc- (tia-portal)-basic-comfort-advanced
WinCC (TIA Portal) provides you the option of exporting alarms to an "*.xlsx" file and importing alarms from such a file. The download included in this entry contains a file that will help you configure bit alarms. Using this file you can have bit alarms generated automatically for HMI operator panels or WinCC Runtime Advanced. Instead of creating each alarm individually, you specify the data of the trigger and acknowledgement tags and receive an import file which creates the bit alarms. You can also use this file to align the alarm system with the control program. The procedure is not suitable for optimized data blocks of the S7-1200 and S7-1500.
Instructions
Preparation in WinCC (TIA Portal)
Open the "HMI tags" editor by double-clicking "Show all tags".
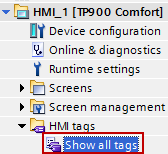
Fig. 01
Create a trigger tag.

Fig. 02
Create an acknowledgment tag if required.

Fig. 03
Using the download file
Download the "WinCCTIA_Generate_Alarms_Excel_d.xlsm" or "WinCCTIA_Generate_Alarms_Excel_e.xlsm" file as required.
Open the file and click "Enable Content".
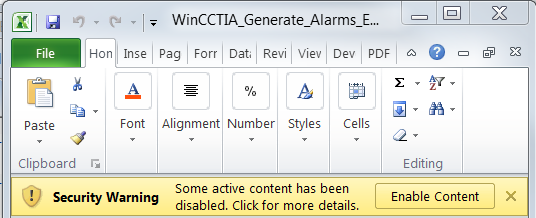
Fig. 04
In field "B5" you enter the name of the trigger tag.
In fields "B7" and "B8" you enter the start address of the tag.
In field "B9" you enter the length of the array.
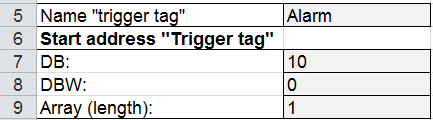
Fig. 05
In field "B11" you enter the name of the HMI acknowledgment tag.
In fields "B13" and "B14" you enter the start address of the tag.
If you do not want to use an HMI acknowledgment tag, leave field "B11" empty.

Fig. 06
Click "Start".

Fig. 07
The alarms and their trigger and acknowledgment addresses are displayed in line 17 onwards.
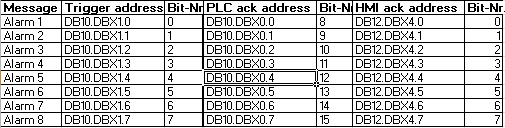
Fig. 08
The PLC acknowledgment tag is used by default.
In field "E3" you enter the required path for the import file.

Fig. 09
In field "E5" you enter the alarm class.

Fig. 10
In column "A" you enter the appropriate alarm texts as required.
Click the "Create import file" button.

Fig. 11
The "*.xlsx" file with the bit alarms opens automatically.
Open the "HMI alarms" editor in WinCC (TIA Portal).
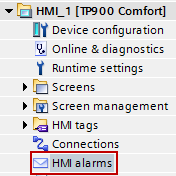
Fig. 12
Click the "Import" button.

Fig. 13
Select the file created in Step 9 and click "Import".
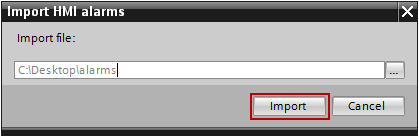
Fig. 14
The import is completed with this warning: "The version is not specified in the XLSX file. The latest version is applied for the import.". Acknowledge the warning with "OK".
Notes
The download in this entry creates the import file in German (Germany) and English (USA). If you wish to import the alarms in another language, you must change the import file accordingly. For this you replace the language code "de-DE" or "en-US" in cells C1 and N1 (Alarm text and Info text) with the code of the desired language.
Delete the data with the "Delete range" button before starting a new run.

Fig. 15
Download
The download includes the "WinCCTIA_Generate_Alarms_Excel_v2_d.xlsm" and "WinCCTIA_Generate_Alarms_Excel_e.v2_xlsm" files.
Copy the required file into a separate folder and then start the file with a double-click.
Import file
https://support.industry.siemens.com/cs/attachments/91435077/WinCC_Tia_generate_alarms_excel_v2_xlsm.zip |
|
| Back to top |
|
 |
|
|
You cannot post new topics in this forum
You cannot reply to topics in this forum
You cannot edit your posts in this forum
You cannot delete your posts in this forum
You cannot vote in polls in this forum
|
Powered by phpBB © 2001, 2005 phpBB Group
Fa-ti si tu propriul forum GRATUIT, pe www.myforum.ro |
 FAQ
FAQ Search
 Memberlist
 Usergroups
 Register
 Profile
 Log in to check your private messages
 Log in


