 |
plc.myforum.ro
PLCs users www.plc.myforum.ro!
|
| View previous topic :: View next topic |
| Author |
Message |
david
Member

Joined: 07 Jan 2012
Posts: 132
|
 Posted: 19/02/2018 21:22 Post subject: Faceplates Posted: 19/02/2018 21:22 Post subject: Faceplates |
 |
|
One client have a basic panel. I know that it's impossible to fabricate a faceplate
Somebody have an idea to produse a faceplate for pumps valve
I have tia portal v13
[/list] |
|
| Back to top |
|
 |
Bourville
Junior

Joined: 10 Feb 2018
Posts: 1
|
| Posted: 19/02/2018 21:51 Post subject: |
|
|
Use something like this instead faceplates
How do you configure screen selection on a Windows-based operator panel with WinCC flexible via controller job 51?
https://support.industry.siemens.com/cs/document/24372078/
How can you make a screen selection on a Windows-based operator panel via the controller without using a controller job?
https://support.industry.siemens.com/cs/document/24372774/ |
|
| Back to top |
|
|
david
Member
Joined: 07 Jan 2012
Posts: 132
|
| Posted: 19/02/2018 22:27 Post subject: |
|
|
thanks Bourvil
It's not what i ask? |
|
| Back to top |
|
|
gert
Member 3


Joined: 02 Jan 2015
Posts: 645
|
| Posted: 25/02/2020 20:13 Post subject: faceplates, templates, pop-up and slide-in screens WinCC TIA |
|
|
How do you optimally use faceplates, templates, pop-up and slide-in screens as well as other design options in your WinCC (TIA Portal) project?
https://support.industry.siemens.com/cs/document/109483375/how-do-you-optimally-use-faceplates-templates-pop-up-and-slide-in-screens-as-well-as-other-design-options-in-your-wincc- (tia-portal)-project
WinCC (TIA Portal) provides a wide range of design elements and configuration options to make the screens in your HMI configuration clearer and easier to operate. This FAQ response briefly introduces the main features.
The following options are available among others to improve the clarity of your HMI configuration in WinCC (TIA Portal) and practically organize operating and display elements.
Reserved screens and screen areas
Global screen
You can create a global screen for each project. This screen is shown in the foreground in front of simple screens and screen templates. As long as messages are present, it serves to temporarily display system diagnostics and message windows as well as alarm indicators (other screen objects are not available in the editor for global screens).
By using diagnostics and message windows in the global screen you ensure that these are always visible and not hidden by other screen elements as long as they are not behind the area of the permanent window.
The WinCC Advanced manual explains the basics of using global screens in a separate section:
https://support.industry.siemens.com/cs/mdm/109091876?c=23534347275&lc=en-WW
https://support.industry.siemens.com/cs/mdm/109773506?c=81228454667&lc=en-WW
Permanent window
The permanent window is a fixed screen area reserved for the permanent display of screen objects. It is a rectangle of adjustable height that stretches across the entire width of the screen at the top edge. The permanent window is identical for all screens and templates and can display any objects.
It might possibly hide the elements of the global screen.
The WinCC Advanced manual explains the configuration of a permanent window in a separate section:
https://support.industry.siemens.com/cs/mdm/109091876?c=23508625163&lc=en-WW
https://support.industry.siemens.com/cs/mdm/109773506?c=101430875147&lc=en-WW
System layer
The system layer has displays that appear in front of all other screen objects and cover them. These displays include input dialogs, operating system messages and the direct buttons of Touch Panels. The user cannot configure the system layer.
Pop-up and slide-in screens
Pop-up screens
Pop-up screens are "windows in windows" that can be displayed and hidden as required.
You can define any number of pop-up screen. How a pop-up screen is seen is controlled via the system function "ShowPopupScreen" that can be triggered via specific buttons or system events. The pop-ups are therefore well suited for context-dependent displays or for setting individual parameters.
Pop-up screens cover all other screen objects including those of the global screen.
The WinCC Advanced manual explains the basics of using pop-up screens in a separate section:
https://support.industry.siemens.com/cs/mdm/109091876?c=66425891211&lc=en-WW
https://support.industry.siemens.com/cs/mdm/109773506?c=90029679499&lc=en-WW
Slide-in screens
You can define one slide-in screen for each of the four sides of the screen, which can then be slid-in from the corresponding side of the screen and displayed. Slide-in cover all other screens for as long as they are displayed; they are hidden when not activated.
The slide-ins are identical for all screens and are therefore suitable for "global" or general settings.
You control the use of a slide-in by setting or clearing the check mark for "Activate" in the "Properties" inspector window of the slide-in. An activated slide-in is visible in the Runtime when you click a free area on the relevant screen side and then click on the "handle" of the slide-in that appears.
The WinCC Advanced manual explains the basics of using slide-in screens in a separate section:
https://support.industry.siemens.com/cs/mdm/109091876?c=68614184203&lc=en-WW
https://support.industry.siemens.com/cs/mdm/109773506?c=90029679499&lc=en-WW
Libraries and Templates
Faceplates
Screen objects that you use several times in the same or similar way should be grouped in faceplates. You can stored these faceplates in a library and use them repeatedly in your projects as often as required. The central management permits you to update all instances of a faceplate by simply changing the underlying block type.
Each instance of a faceplate can be assigned parameters separately. It is therefore simple, for example, to configure identical plant sections: you confecționate an instance of the faceplate for each plant section and the separate instances are linked with the tags of each plant section.
The faceplates are inserted into existing screens just like other grouped screen objects and can be positioned as required.
Sample applications for creating, managing and using faceplates is available in
https://support.industry.siemens.com/cs/document/68014632/creating-faceplates-with-wincc-runtime-advanced-and-comfort-panels
Further Information
Sample Blocks for WinCC (TIA Portal) and STEP 7 (TIA Portal) (for S7-1200 and S7-1500 in SCL)
https://support.industry.siemens.com/cs/document/66839614/example-blocks-for-wincc- (tia-portal)-and-step-7-(tia-portal)-for-s7-1200-and-s7-1500-with-scl?lc=en-us
Faceplates for the Visualization of Sentron PAC Power Meters for WinCC Runtime Professional
https://support.industry.siemens.com/cs/document/67318600/faceplates-for-the-visualization-of-sentron-pac-power-meters-for-wincc-runtime-professional?lc=en-us
Sample Blocks for WinCC V7 and STEP 7 (TIA Portal) (for S7-1200 and S7-1500 in SCL)
https://support.industry.siemens.com/cs/document/31624179/example-blocks-for-wincc-v7-and-step-7-v13- (tia-portal)-for-s7-1200-and-s7-1500-in-scl?lc=en-us
Machine-oriented operator control and monitoring in Online Support
https://support.industry.siemens.com/cs/document/93905586/machine-oriented-operator-control-and-monitoring-in-the-online-support?lc=en-us
Screen templates
Using screen templates you configure objects that are supposed to be identical in multiple screens, for example company logos or function keys for navigating between screens.
You assign a specific screen a screen template via the "Properties" inspector window of the screen concerned. The elements of the screen templates are displayed in addition to the objects of this screen in the background.
The WinCC Advanced manual explains the basics of using screen templates in a separate section:
https://support.industry.siemens.com/cs/mdm/109091876?c=65652999307&lc=en-WW
https://support.industry.siemens.com/cs/mdm/109773506?c=111239666059&lc=en-WW
Screen layers
Within a specific screen, a global screen, screen template of "simple screen", you can arrange the objects to be displayed in 32 "layers" each. Objects of a layer with a higher index always cover objects of a layer with a lower index as long as they are visible.
The WinCC Advanced manual explains the basics of using screen layers in a separate section:
https://support.industry.siemens.com/cs/mdm/109091876?c=65661487627&lc=en-WW
https://support.industry.siemens.com/cs/mdm/109773506?c=94357261195&lc=en-WW
Configuration
The global screen, screen templates as well as pop-up and slide-in screens are configured by opening the corresponding editors in the project tree:
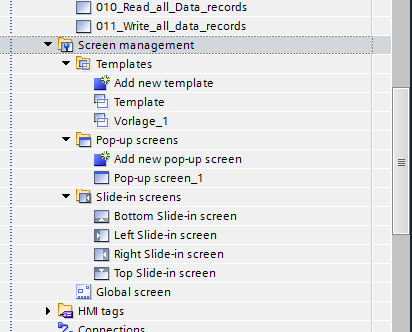
Fig. 1
Define the area of the permanent window by pulling down the top screen edge of any screen (except the global screen) in the editor: The pulled up area is the permanent window. Screen objects are inserted as usual in standard screens.
The management of faceplates is done via the "Libraries" task card.
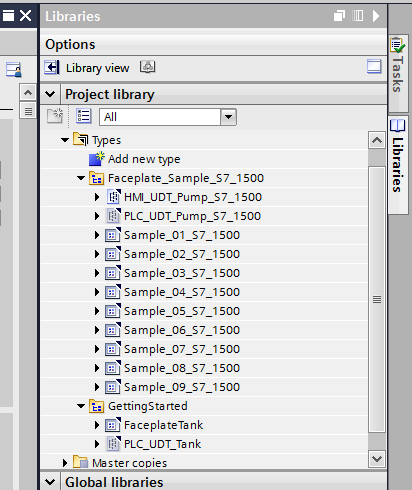
Fig. 2
To move screen objects back and forth between different layers and to control the visibility of the separate layers, you open the "Layers" palette in the "Layout" task card. (Note that by using the "Order..." commands from the main menu you can arrange the objects yet again within a layer.)
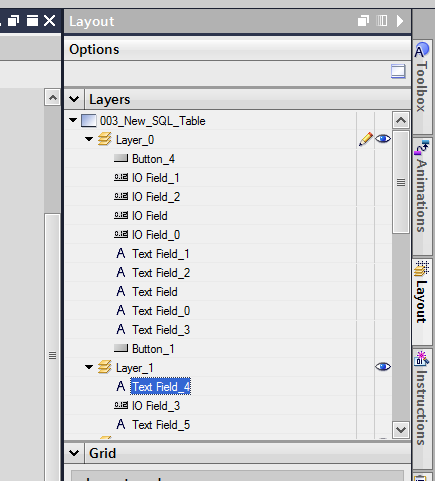
Fig. 3
Priority in the Display
An overview of the order in which the different screen elements are arranged in front of and behind each other is available in the WinCC Advanced manual in the description of the global screens
https://support.industry.siemens.com/cs/mdm/109091876?c=23534347275&lc=en-WW
https://support.industry.siemens.com/cs/mdm/109773506?c=81228454667&lc=en-WW
Note
Not all the design options are supported by all HMI operator panels or by all version of WinCC (TIA Portal). Refer to the corresponding manuals about the availability of the individual functions.
Further Information
Comprehensive information about operating WinCC (TIA Portal) V15 is available in this manual:
https://anonfile.com/Jan9Vfcdo0/STEP_7_WinCC_V16_enUS_en-US_pdf
https://anonfile.com/V0n5Vbcao6/STEP_7_WinCC_V15_1_enUS_en-US_pdf
https://anonfile.com/5ej7Vec3oe/316241749_WinCC_Files_V2_zip
https://anonfile.com/75j0Vdcao2/67318600_sentron_pac_wincc_prof_en_pdf
https://anonfile.com/9fj4V5c9o0/31624179_DEMO_BLOCKS_V2_zip
https://anonfile.com/B3jcV6cao0/67318600_sentron_pac_wincc_prof_library_zip
https://anonfile.com/Jfj4V2cao3/66839614_STEP7_Example_Blocks_V13_SP1_zip
https://anonfile.com/L9jeVdc6o8/66839614_WCA_Faceplates_SiVArc_V14_en_pdf
https://anonfile.com/N4j9Vfc3o4/31624179_WinCC_Documents_en_V2_zip
https://anonfile.com/P5j1V0c4o9/66839614_WCA_Faceplates_Library_SiVArc_V14_zip
https://anonfile.com/R8jfV8c7o1/66839614_WCA_Faceplates_Library_V13_SP1_zip
https://anonfile.com/b5keVdcfoe/66839614_WCP_Faceplates_Library_SiVArc_V14_zip
https://anonfile.com/d6keVcc0o2/66839614_WCP_Faceplates_SiVArc_V14_en_pdf
https://anonfile.com/fdkeVacfo2/66839614_WCP_Faceplates_Library_V13_SP1_zip
https://anonfile.com/jbkaVac0o0/66839614_WCA_Documents_V13_SP1_en_zip
https://anonfile.com/nck2V6c1o7/67318600_sentron_pac_wincc_prof_demo_zip
https://anonfile.com/r0kfV4c5o1/68014632_Faceplates_instruction_V14_zip
https://anonfile.com/t8k5V9cfo6/68014632_Faceplates_EngineeringExamples_en_pdf
https://anonfile.com/vfk8Vccao2/68014632_faceplates_instruction_doku_v14_en_pdf
https://anonfile.com/x8k7Vecdod/66839614_WCP_Documents_V13_SP1_e_zip
https://anonfile.com/z5k5V9c7o5/68014632_Faceplates_GettingStarted_v14_en_pdf
https://anonfile.com/54k3V8c6o7/31624179_DEMO_PROJECT_V2_zip
https://anonfile.com/L2k1V9cfoa/66839614_WCP_Faceplates_Demo_V13_SP1_zip
https://anonfile.com/Zdk2Vcc9o2/66839614_WCA_Faceplates_Demo_V13_SP1_zip
https://anonfile.com/P2s1V0caoe/36435784_s7_wcf_blocks_supplements_en_pdf
https://anonfile.com/R2s3V7c9of/68679830_bst_files_v23_winccv7_zip
https://anonfile.com/T1sfV0c5oc/68679830_bst_example_doc_wincc_v7_e_pdf
https://anonfile.com/V1s0Vdc0o3/36435784_documentation_en_zip
https://anonfile.com/X8s4V4cdo0/68679830_bst_docs_v23_wincc_v7_en_zip
https://anonfile.com/b4taV8c5o1/36435784_s7_wcf_blocks_supplements_zip
https://anonfile.com/d5tdV1c9o4/68679830_bst_example_doc_wincc_v72_en_pdf
https://anonfile.com/hft6Vac5oe/68679830_bst_files_v1_wincc_v72_zip
https://anonfile.com/l7tbV4cfoc/68679830_bst_example_wincc_v7_zip
https://anonfile.com/p3tdVec6od/36435784_s7_wcf_blocks_code_zip
https://anonfile.com/r0tfVbc1o0/68679830_bst_example_wincc_v72_zip
https://anonfile.com/t8tdVec7o0/68679830_bst_docs_v23_wincc_v72_en_zip |
|
| Back to top |
|
|
|
|
You cannot post new topics in this forum
You cannot reply to topics in this forum
You cannot edit your posts in this forum
You cannot delete your posts in this forum
You cannot vote in polls in this forum
|
Powered by phpBB © 2001, 2005 phpBB Group
Fa-ti si tu propriul forum GRATUIT, pe www.myforum.ro |
 FAQ
FAQ Search
 Memberlist
 Usergroups
 Register
 Profile
 Log in to check your private messages
 Log in


